Original Link: https://www.anandtech.com/show/6694/msi-z77-mpower-review-the-xpowers-little-brother
MSI Z77 MPower Review: The XPower’s Little Brother
by Ian Cutress on January 26, 2013 10:30 AM EST- Posted in
- MSI
- Motherboards
- Z77
- Overclocking
Like many other manufacturers, MSI is building brands to aid the development of their product lines. Over the past few Intel chipsets MSI have developed their Big Bang family, such as the P55 Trinergy, P55 Fuzion, X58 XPower, P67 Marshal, X79 XPower-II and now the latest, whilst devoid of the Big Bang part from the official title, is the Z77 MPower. MSI have coined this as ‘XPower-II’s little brother’, designed as an overclocking board to be paired with the MSI Lightning range of GPUs. As a result, the Z77 MPower is designed with the MSI Lightning Twin Frozr IV scheme in mind. We’ve tackled one Z77 overclocking board already, so how does the MSI fare? Read on for the full review.
Overclocking for Z77 – Why Everyone Is At It
The motherboard market shrank in 2012, with reports suggesting that from the 80 million motherboards sold in 2011, this was down to 77 million worldwide in 2012. In order to get market share, each company had to take it from someone else, or find a new niche in an already swollen industry. To this extent, after the success of the ROG range, the top four motherboard manufacturers now all have weapons when it comes to hitting the enthusiast or power user with an overclocking platform. These weapons are (with prices correct as of 1/24):
$400 – Gigabyte Z77X-UP7
$370 – ASUS Maximus V Extreme
$280 – ASUS Maximus V Formula
$240 – ASRock Z77 OC Formula
$210 – MSI Z77 MPower
$200 – ASUS Maximus V Gene
There are two main differentiators between the low (<$250) and the high (>$350) end. The first is usually the choice to include a PLX PEX 8747 chip to allow 3-way or 4-way GPU setups. We covered how the PLX chip works in our 4-board review here, but to summarize, this functionality can add $50-$80 onto the board depending on the bulk purchase order of the manufacturer and the profit margins wanted. The second is usually attributed to the functionality and power delivery – the 32x IR3550s used on the Gigabyte Z77X-UP7 costs them a pretty penny, and the extensive feature list of the ASUS ROG boards usually filters through.
In the past there have been attempts at pure overclocking boards, such as the Gigabyte X58A-OC, which was entirely stripped of all but the necessary components for pushing overclocks under sub-zero conditions for competitions. The board itself was cheaper due to the functionality not present, but it did not provide a rock solid home system for many users. The ASUS ROG range, as we reviewed in 2012, has been releasing motherboards for both gaming and overclocking for several years, trying (and succeeding) with the mATX Gene, ATX Formula and Extreme. All three of these boards continuously push both the gaming and OC frontiers, with a slight gaming focus on the Formula and an OC focus on the Extreme, but all boards cross over into each other’s territory very easily.
A motherboard in this area cannot focus solely on the overclocking component – there has to be additional focus for power users and gamers in order to shift units, as competitive overclocking is a small blip on the radar. I hope all the players realize this!
MSI’s foray into the mix is with their Big Bang range. While it might not have struck the headlines as strongly as some of the other manufacturers, MSI is now splitting the range into two segments similar to ASUS. For the extreme Intel platforms, such as X79/Sandy Bridge-E, we have the X79 XPower-II which we reviewed quite positively early in 2012. For the mainstream Intel platforms, MSI are going with the MPower, coined in advertising videos as the XPower-II’s ‘little brother’. The Z77 MPower seems to have a little more focus than the older XPower-II, with the styling designed to fit in with the MSI Lightning range of GPUs (that are well known for their overclocking prowess), and feedback from MSI’s Master Overclocking Arena (MSI: MOA) extreme overclocking competitions has helped with design.
MSI Z77 MPower Overview
If I were to build a motherboard from scratch, I would first identify all my targets and then order them in terms of importance. If the motherboard was designed to go within a specific price point, I would have a choice of raising the quality of the onboard components as a whole, or deciding to focus the cost on one particular area. This includes power delivery, options specific to each market, controllers, PCIe layout, board layout, heatsink design, and so on. With the Z77 MPower, MSI have hit a small road block in terms of their design philosophy – they wanted a model to bare the Big Bang name for Z77, but focus on both overclocking and gamers alike within tight budget constraints. It happily works for some areas, but not for others, on both the gaming and overclocking side of the coin. Let me explain.
As a gamer, I would want ample space for GPUs, a one-button OC method, plenty of rear IO connectivity with good controllers, a beefed up audio solution, and something to keep me up to date with the latest drivers and software. As an overclocker, I want an improved power delivery, easy-to-use overclocking tools, reductions of instability, a fast boot time, and in the case of extreme overclocking, a board that is easy to prepare and can do the changes I want to do.
As a gamer, the Z77 MPower gives an Ivy Bridge oriented GPU layout with either PCIe 3.0 x16/-/-, x8/x8/- or x8/x4/x4, and with plenty of space for GPU slots one and two. We get OC Genie for a quick CPU OC to 4.2 GHz on an i7-3770K, the rear IO caters for PS/2, USB 2.0, USB 3.0, as well as WiFi, and the Live Update 5 software onboard keeps all the drivers up to date as they are released. On the downside is our regular Realtek ALC898 audio codec with no special design or anything above that (moot point for gamers with their own audio cards), a regular Realtek NIC, the Atheros WiFi is single-stream 2.5 GHz-only, and there are no extra SATA ports. A brief upside in network connectivity is the addition of Realtek software to prioritize traffic over the network, and the color scheme is matched with the MSI Lightning range of GPUs.
As an overclocker, the Z77 MPower gives us a nice flat area around the socket with which to insulate, and the Super Ferrite Chokes and power delivery are designed to be efficient in terms of heat generated. The PCIe triple slot layout helps with mounting copper pots for liquid nitrogen setups, and the PCIe power connector is out of the way. The voltage check points, MultiBIOS, power/reset buttons and two-digit debug are obvious requirements, and the Click2BIOS button ensures BIOS entry every time (which also helps when select Fast Boot options). The WiFi and Bluetooth modules add a potential cause of instability, though these could be removed. The downside is more focused in the software, as we had BIOS issues which restricted on-the-fly overclocking in the operating system, limiting our peak BCLK to 105 MHz (other users have had better results). Nevertheless, we still achieved a load-stable 4988.5 MHz on an i7-3770K using an air cooler that hit 99ºC peak, and our top memory kit was stable at 2800 11-14-14 under stock voltage.
We get a form MultiCore Enhancement at stock settings, meaning the turbo multiplier is ramped up under all loading. Despite this, benchmark wise at stock was a little disappointing and showed minor efficiency losses across the range compared to the competition. The DPC latency time was below 200 microseconds (which is great), although the stock POST times were at 12.78 seconds which is just short of our artificial 12-second goal line. The PCIe layout aided 3-way GPU setups compared to those that borrow four lanes from the chipset (such as the OC Formula), but in comparison the USB 2.0 performance is in a similar hole as the Z77A-GD65 at 25 MBps rather than ~32 MBps of the competition. This is presumably due to the nature of MSI’s default BIOS settings.
Overall the MSI Z77 MPower is a nice board to own, as long as you do not go probing too far into the settings. I like the OC Genie button, although I think the default setting is a little conservative at 4.2 GHz. MSI advertise that every Z77 MPower is tested with a 30%+ overclock for 24 hours running Prime95 under limited airflow conditions, which would push the i7-3770K to 4.55 GHz, and most 3770Ks should do this quite easily so I don’t see why the OC Genie button sets ~4.4 GHz by default. The color scheme fits in nicely with the Lightning GPU series and the Live Update 5 software has been updated and scores very highly in my book, along with a set of nice fan options in Control Center. The MSI Z77 MPower unfortunately misses both side of the coin as it is neither the perfect gamer product nor the perfect overclocking product - it tries to be both, but due to having to hit a price point, it misses key features on both. Nevertheless, I could easily see this in a gaming build with a pair of MSI Lightning GPUs, the OC Genie button pressed and a separate audio card being used. The only question is if it is worth $30 less than the ASRock Z77 OC Formula, or if it is worth more than the $200 mATX ASUS Maximus V Gene.
Visual Inspection
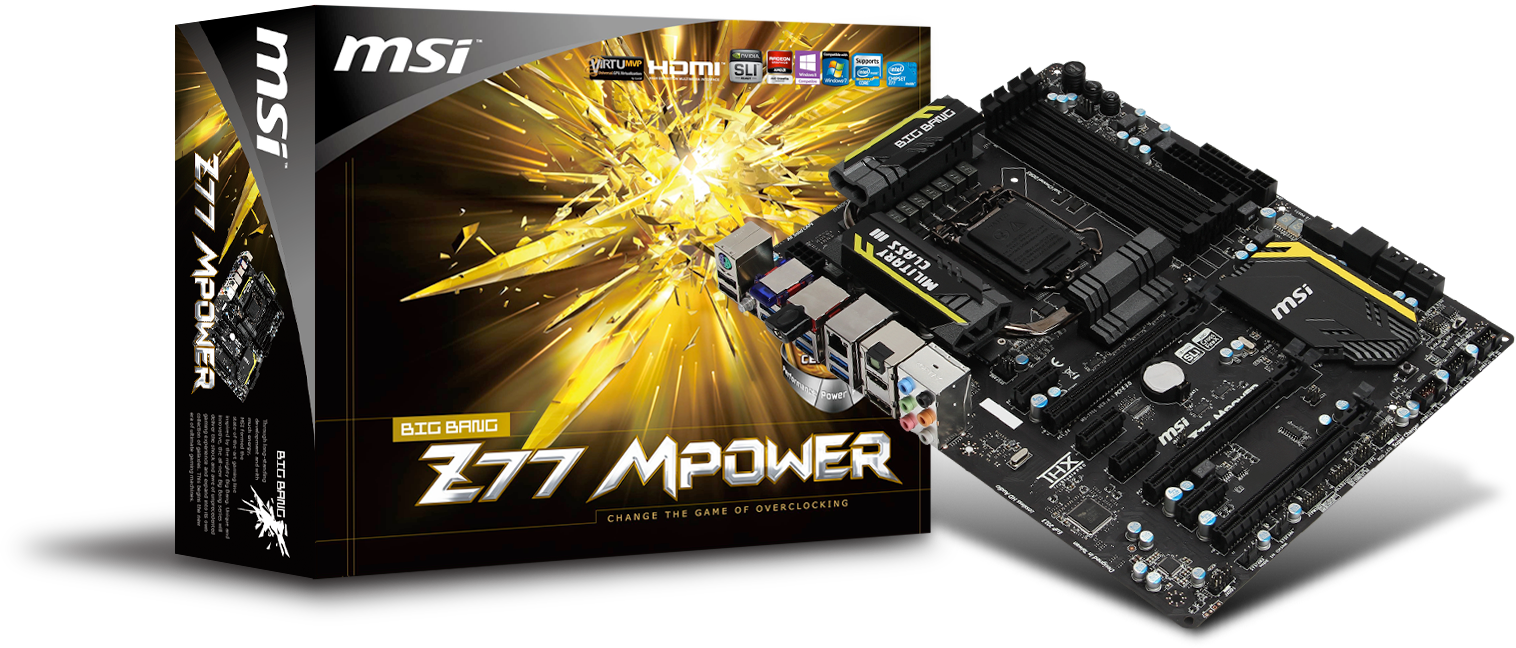
The MSI Z77 MPower greets us with a very sleek and clean black livery with a yellow trim, akin to the Twin Frozr IV used on the MSI Lightning series GPUs. MSI have specifically gone out of their way to make sure all the ports and connectors are black, which is something we do not normally see as many manufacturers will just use what colors they have in stock on lower priced models. According to the marketing material, the top PCB layer is designed to protect all the traces used on the board by putting them down one layer – we see this is the case, and leads to a nicer looking product. It is also argued that this can also help with electromagnetic interference (EMI), resulting in cleaner signals, though we have no way of actually testing that (or if it makes a difference to the end user).
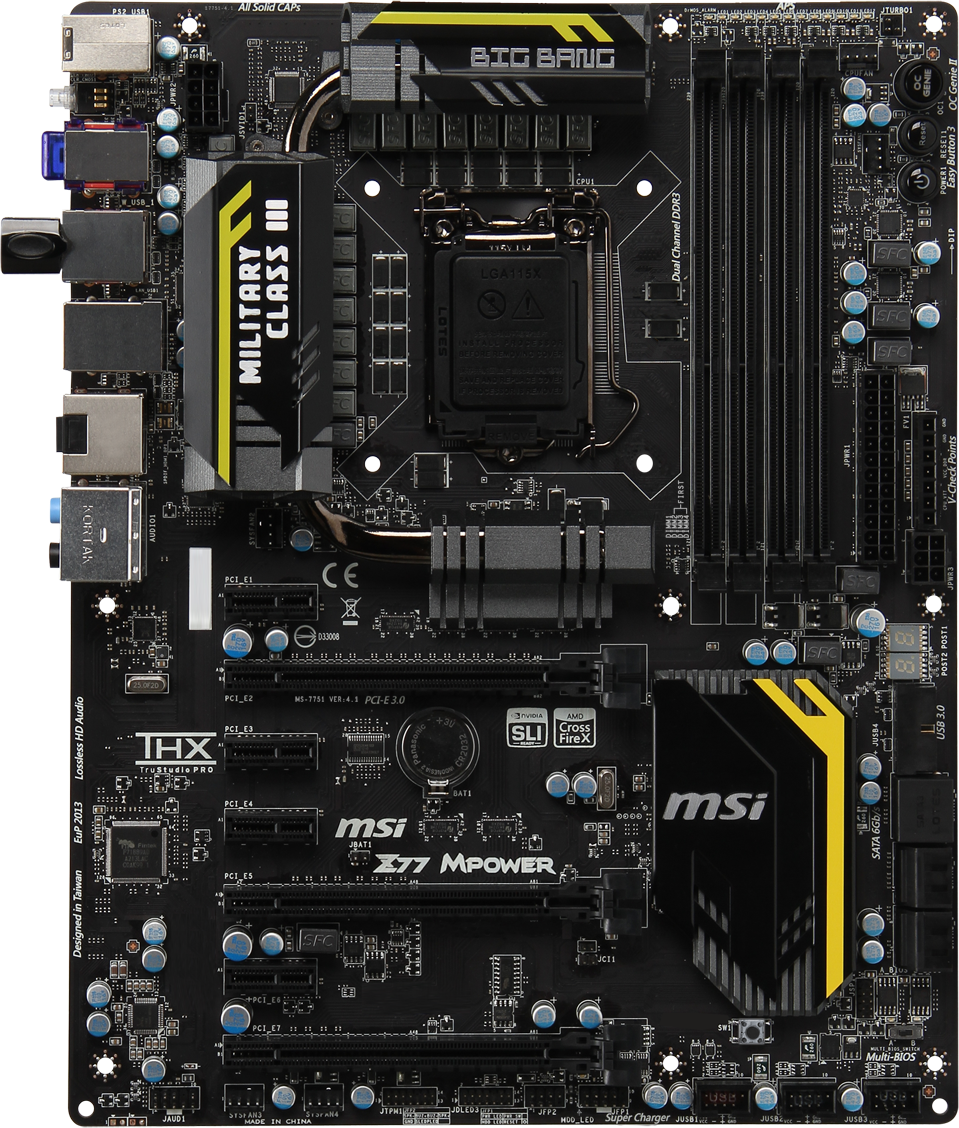
The socket area is nice and clean for insulating, and big air coolers will be hindered more by any memory installed than the power delivery heatsinks. The heatsinks covering the power delivery are all connected via heatpipe, but also low and fat with small grooves for airflow, relying on mass rather than surface area to deal with heat generation. The 8-pin CPU power connector is to the top left of this, relegated away from the edge of the board due to the top heatsink placement.
There are three fan headers around the socket – the 4-pin CPU fan header is the nearest on the other side of the memory, partnered by another system 4-pin, and the third 4-pin is located beneath the main heatsink to the bottom left of the socket. The other two 4-pin fan headers on board are located at the bottom. It is interesting to note that the memory slots here use a dual-latch system, rather than the single sided latch that is started to be the norm on some Z77 boards, and can be preferred by overclockers that take out/put in hardware frequently.
On the top right we get a series of lights informing the user how many of the phases are being used at any one time, a header for the MSI MultiConnect Panel (which was announced in Dec 2011 but I cannot find a record of it ever being on sale), two of the afore mentioned fan headers, and what MSI Call ‘Easy Button 3’, which to the rest of us means a power button, a reset button, and the OC Genie button. Further down we get our 24-pin ATX power connector, which is slightly inside the edge of the board in order to accommodate 7 voltage check points and a 6-pin PCIe VGA power connector. Having the 24-pin ATX power connector slightly away from the motherboard is not unheard of, but I would prefer it up against the edge to make cable routing easier, and so if I had to use the V-Check points, the cable from the PSU would not be in the way.
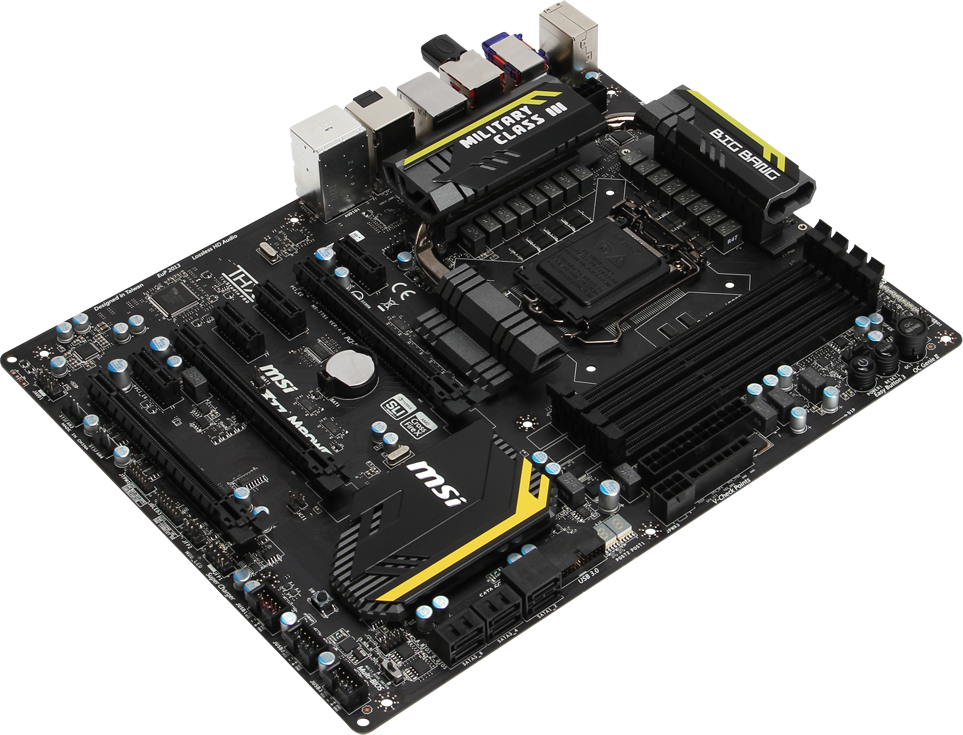
We get a two-digit debug display beneath the 6-pin PCIe VGA connector, which is ultimately useful for debugging or overclocking. It also doubles up as a CPU temperature display after POST, which I would love to be the norm for all two-digit debug displays. Our USB 3.0 header is found at right angles to the board just above the SATA ports, which allows it to be used when a large GPU is put in place and is in an ideal location for any case USB 3.0 or for a front panel USB 3.0 device. Our SATA ports are the six from the chipset (no additional controllers here), with the top two being SATA 6 Gbps and the bottom four being SATA 3 Gbps. The MultiBIOS switch is below these, which allows for changing to a different overclocking BIOS or switching out when a BIOS error occurs (more about this later).
The chipset heatsink follows the design of the power delivery heatsinks, being black with a yellow motif, but the more grooves in this heatsink suggest that in order to dissipate the ~7W from the chipset, air flow and heat sink surface area are preferred. The interesting button is below the chipset, in the form of a Go2BIOS button. This is something I originally saw on the Intel DX79SI on the back panel, but due to the new quick booting options now applied in BIOSes, users cannot easily access the BIOS. Previously it required either a BIOS reset, or if the board was in a case, software. The software is still part of the package, but overclockers would prefer not to install XYZ if they do not have to – hence the inclusion of this button. Despite this, the button has the potential of being obscured if the second GPU is a large three-slot monster, but I am glad it is present.

The bottom of the board, from left to right, gives us the front panel audio connector (Realtek ALC898), two 4-pin fan headers, a TPM header, a JDLED3 header (translates as Jumper Diagnostics LED3 header, though the manual explicitly states it is used for the MSI Voice Genie, another Dec-2011 announced but yet-to-be-released product), two front panel headers (one for buttons and lights, another for lights and buzzers) and three USB 2.0 headers, the first of which is for fast charging.
The PCIe layout is designed to aid single and dual PCIe device users, though the layout supports the full tri-GPU Ivy Bridge specifications, splitting the 16 PCIe 3.0 lanes either x16/-/-, x8/x8/- or x8/x4/x4 rather than some other motherboards (ASRock Z77 OC Formula for example) that borrow four PCIe 2.0 lanes from the chipset for the final full-length PCIe port. From top to bottom, we get a PCIe x1, x16 (runs at x16 or x8), x1, x1, x16 (runs at x8 or x4), x1, x16 (runs at x4). The top PCIe x1 will only support half-width PCIe x1 cards due to the location of the extended power delivery heatsink.

The rear IO panel is designed to be full of functionality, and MSI have pressed on with a large number of rear USB 3.0 ports, despite the fact that they do not seem to work when installing an OS – I use three USB devices to install an OS (Keyboard, Mouse, USB Stick with OS image), so only having access to two means I have to switching the mouse/keyboard until the USB 3.0 drivers are installed. However, from left to right we get a combination PS/2 port, two USB 2.0 ports, a ClearCMOS button, a Bluetooth 3.0+HS module (Atheros AR3011), two USB 3.0 ports from the chipset, four USB 3.0 ports from a Renesas uDP72020 controller, a WiFi 802.11b/g/n 2.5 GHz only module (Atheros AR9271), a gigabit Ethernet port (Realtek 8111E), a HDMI output, a DisplayPort output, an optical SPDIF output and audio jacks.


Board Features
| MSI (Big Bang) Z77 MPower | |
| Price | Link |
| Size | ATX |
| CPU Interface | LGA-1155 |
| Chipset | Intel Z77 |
| Memory Slots |
Four DDR3 DIMM slots supporting up to 32 GB Up to Dual Channel, 1066-3000 MHz |
| Video Outputs |
HDMI DisplayPort |
| Onboard LAN | Realtek 8111E |
| Onboard Audio | Realtek ALC898 |
| Expansion Slots |
3 x PCIe 3.0 x16 (x16/-/-, x8/x8/- or x8/x4/x4) 4 x PCIe 2.0 x1 |
| Onboard SATA/RAID |
2 x SATA 6 Gbps (Chipset), RAID 0, 1, 5, 10 4 x SATA 3 Gbps (Chipset), RAID 0, 1, 5, 10 |
| USB |
4 x USB 3.0 (Chipset) [2 onboard, 2 rear panel] 4 x USB 3.0 (Renesas uDP72020) [4 rear panel] 8 x USB 2.0 (Chipset) [6 onboard, 2 rear panel] |
| Onboard |
2 x SATA 6 Gbps 4 x SATA 3 Gbps 1 x USB 3.0 Header 3 x USB 2.0 Header 5 x Fan Headers 1 x Multi-BIOS Switch 1 x TPM Module 1 x Multi-Connect Panel Header 1 x Debug LED 7 x Voltage Check Points 1 x Go2BIOS Button 1 x OC Genie Button Power/Reset Buttons Front Panel Header Front Panel Audio Header |
| Power Connectors |
1 x 24-pin ATX Power Connector 1 x 8-pin CPU Power Connector 1 x 6-pin PCIe Power Connector |
| Fan Headers |
1 x CPU (4-pin) 4 x SYS (4-pin) |
| IO Panel |
1 x Combination PS/2 Port 2 x USB 2.0 1 x ClearCMOS Button 1 x Bluetooth 3.0+HS (Atheros AR3011) 1 x WiFi 802.11 b/g/n (Atheros AR9271) 2 x USB 3.0 (Chipset) 4 x USB 3.0 (Renesas uDP72020) 1 x Optical SPDIF Output 1 x HDMI 1 x DisplayPort Audio Jacks |
| Warranty Period | 3 Years |
| Product Page | Link |
Some of the functionality on board is worth of praise – OC Genie, the Power/Reset/Two-Digit combination and the Go2BIOS button should help both gamers and overclockers alike. The use of five 4-pin fan headers will suit everyone as well, and the voltage check points will help extreme overclockers monitor their hardware. On the functionality, the location of the Bluetooth/WiFi modules frees up space on the board itself, though ideally a 5 GHz WiFi module should have been considered. The Realtek combination of NIC+audio are often sold at discount, and MSI might have considered a better audio chip with EMI shielding in order to push the board onto gamers. The Renesas USB 3.0 controller is a relative unknown – I would have preferred the middle ground and gone with a two-port controller and switched to another pair of USB 2.0 ports just for compatibility. The lack of extra SATA controllers puts the MSI Z77 MPower a step behind the ASRock Z77 OC Formula in storage.
MSI Z77 MPower BIOS
Over my previous analyses of the MSI graphical BIOS platform, I have often praised various aspects of the design. MSI did a good thing and opened up the design to an internal competition, and picked a winner from that to become the next BIOS (it actually went to 3rd place for technical reasons), and thus they did not go with whatever designer X decided which might be what happens as some of the smaller motherboard manufacturers. I have also liked the information bar at the top of the BIOS, which displays important information about the BIOS and stuff a user or power user should know right at the start, rather than wading through options and menus to get to the crucial information. In the previous analyses, there were a few suggestions to upgrade what I thought at the time was a good BIOS – unfortunately none of these have been taken on board (one suggestion for software did though, more about that on the next page).
MSI have stagnated a little on the BIOS front, and other manufacturers are cherry picking the best bits from the competition in order to meet them head to head with a better overall system. ASUS’ system has been good from the start, and their Easy mode and layout has always been great. ASRock has recently have attacked the BIOS field with an overall nicer looking frontage, better stability, a better arrangement of features, and new features that apply to various niche user scenarios. If this latest BIOS for the MSI Z77 MPower is the best MSI has to offer, then they have been sitting on their laurels behind a nice design while others are overtaking them.
Flashing a Corrupt BIOS
During my use of the MSI BIOS, I came across an error that should be distinctly noted in the review. At the time of writing the review, MSI know about this (as has been reported in other Z77 MPower reviews and on their forums), but the latest public BIOS, V17.6, does not fix them.
Firstly is the recognition of Intel’s Management Engine. For every Intel motherboard, the management engine is a critical part of chipset and processor initialization, and usually pertains to microcode recognition for the processor and other things, such as overclocking options. When the MSI Z77 MPower arrived in my hands, it has Intel ME 7.xx as part of the system, and naturally I updated to the latest 17.6 BIOS which should have included ME 8 as part of the package. After flashing, the BIOS subsequently reported an ME version of ‘N/A’, but allowed me to continue my normal testing routine. After stock testing, I tried overclocking the board, and noticed that the OS software ClickBIOS and Control Center both greeted me with a message ‘Intel ME8 required for OS Overclocking!’. Neither of these applications would allow for on-the-fly BCLK overclocking, so I went back to the BIOS and tried to revert to the old BIOS and the old ME version. I flashed backwards to 17.4 using the BIOS itself, then forward to 17.6, but no change. In order to try something different, I tried going back to 17.4 again, but the system corrupted during flashing. The result of this corruption is that when the motherboard is turned on, it spins up for two seconds, and then turns itself off – no POST messages, nothing on the two-digit debug. A bad BIOS flash is not a completely uncommon occurrence, so I did what I have done in the past – boot on the good BIOS (as the system has two BIOSes I can switch between), and reflash the broken BIOS by clicking the switch back after POST. This did not work, and has been noted by other users. The only way around this according to MSI so far is to use the Intel Flash Programming Tool on a DOS bootable USB stick, and requires obtaining the unique ID of the network card. It is a bit of a faff, something which MSI should have sorted before making the board, and something MSI should publish a guide on how to do it. (In actual fact, there should be an option in the BIOS such that a user can get the board to copy the BIOS from one chip to another.) If a guide is published, we will put a link in here to help, but if you end up with a corrupt BIOS, I suggest making sure you do not update the other until the first one is working again.
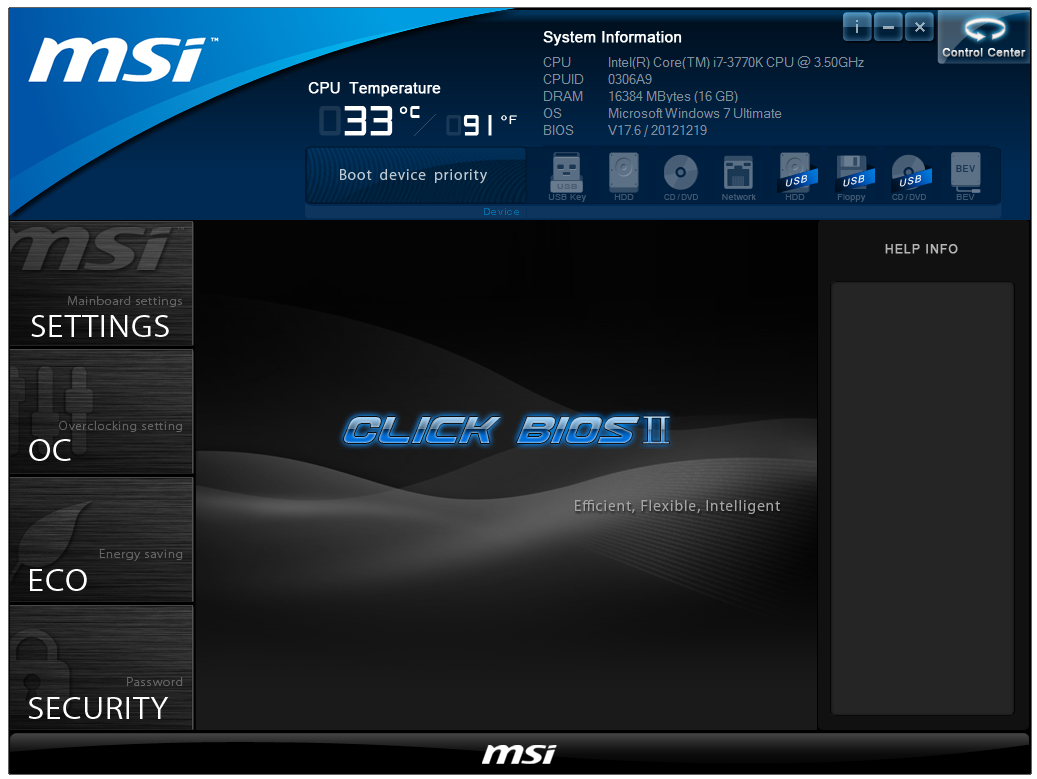
The BIOS
As mentioned, the general style of the MSI BIOS is quite nice and pleasant to look at. We get a bar along the top that tells us the motherboard in use (albeit in MSI internal code), the version of the BIOS installed, the CPU installed, the frequency of the CPU, the size of the memory installed, the speed of that memory, the CPU and chipset temperatures and our boot device priority. All that is missing is perhaps a voltage or fan speed or two.
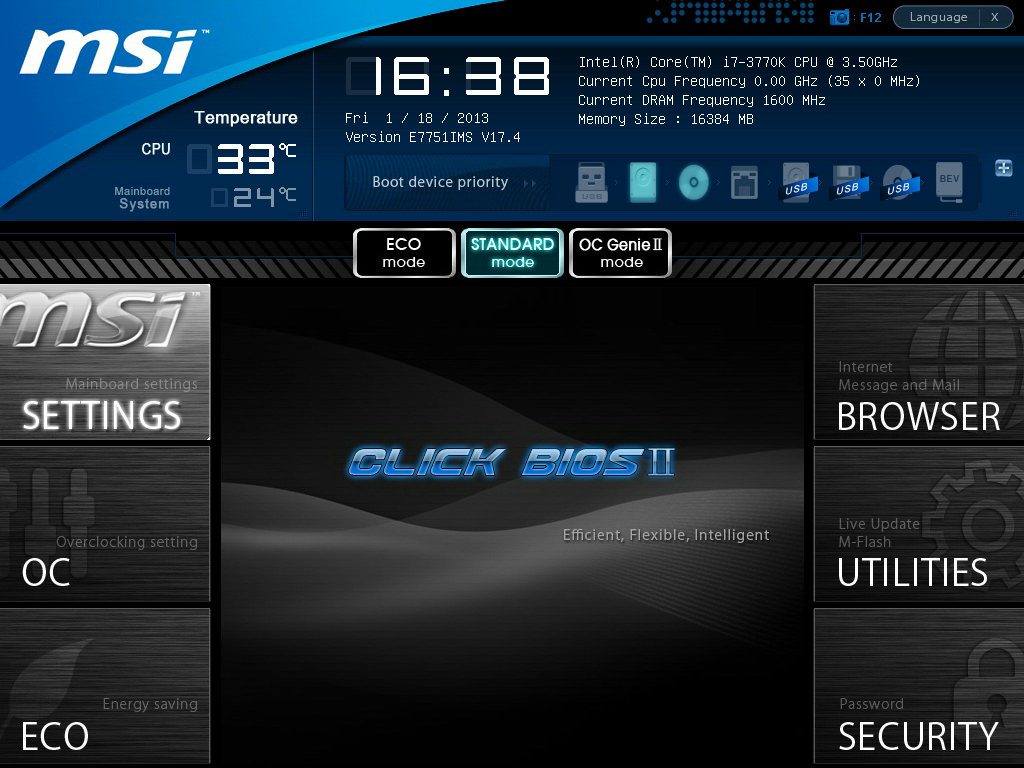
While this top banner is nice, it is incredibly big, taking up about 1/3 of the screen real estate. Throughout choosing the BIOS options, this top banner is constant (which I approve of), but the size of it means that all the other options are limited, leading to a lack of explanation of a lot of options.
In the middle we get three buttons – ECO mode, Standard mode and OC Genie II mode, of which the first uses a setting regime to reduce power, and the third applies the internal OC Genie overclock settings. To the left and right are six buttons for the main areas of the BIOS, and the center of the screen is where our options are.
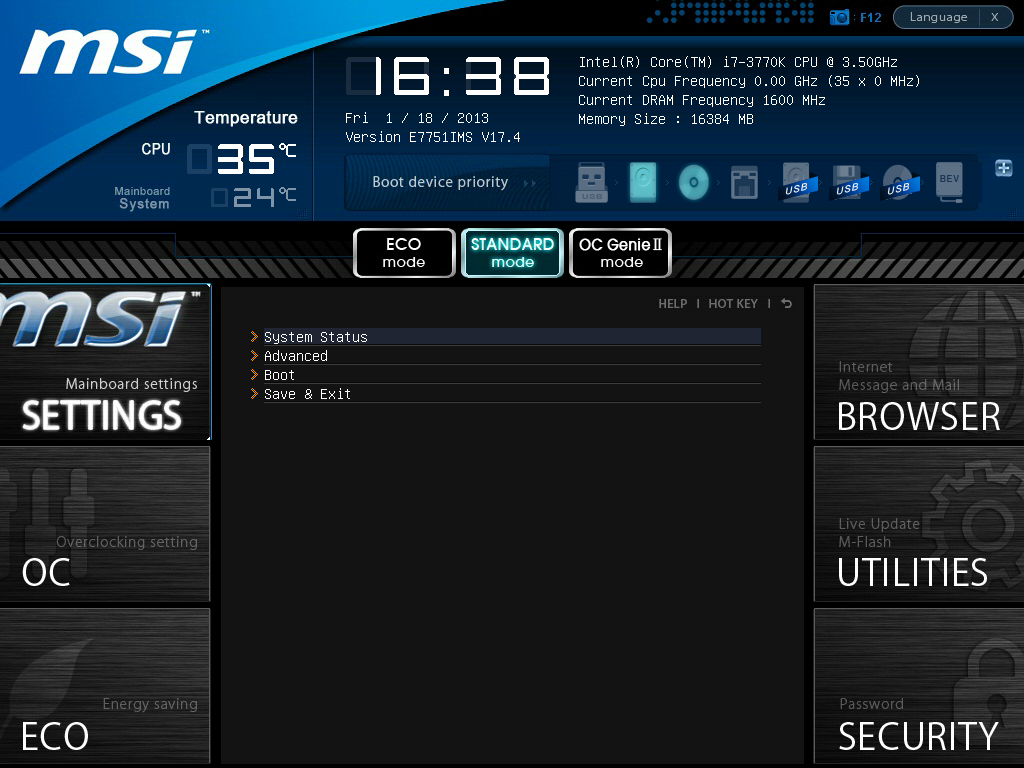
The Settings menu takes us to some more options regarding the system status, the advanced non-overclocking chipset options, the boot menu, and a save and exit menu. The Advanced selection gives us what we normally see under a ‘Configuration’ menu in any other BIOS:
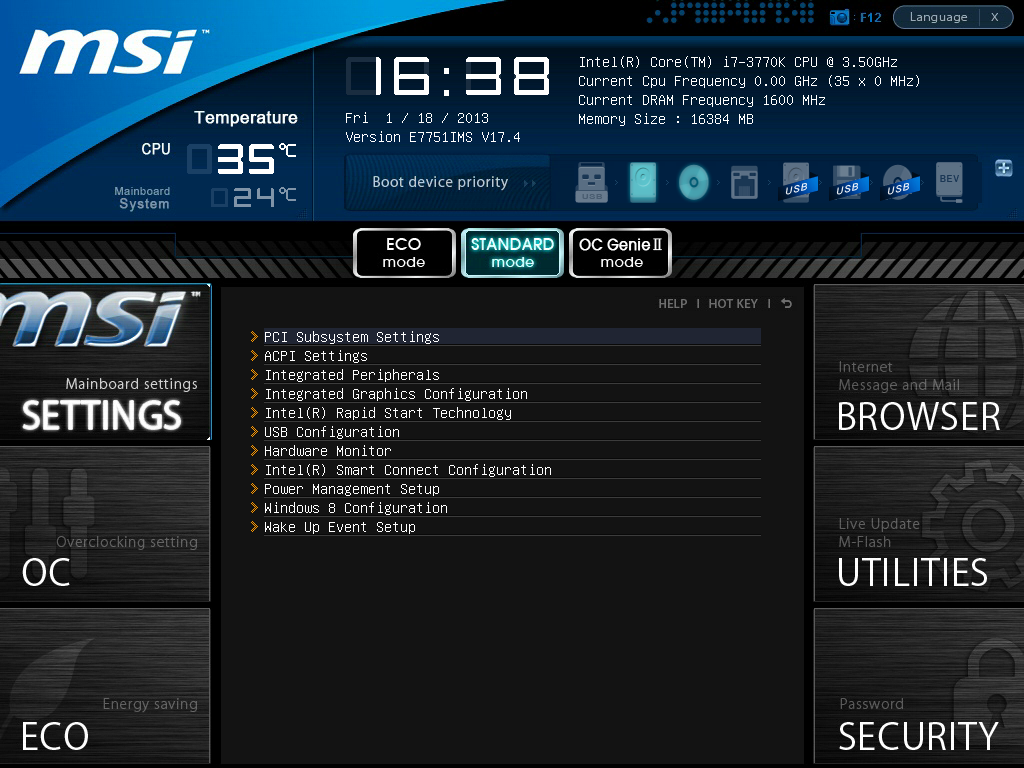
The normal array of SATA, USB, Controller, IGP, PCIe and power management settings are accessed in this Advanced menu. By default PCIe 3.0 is enabled, as well as AHCI, the onboard WiFi, onboard Bluetooth and Intel Smart Connect. If a user wants to run Lucid Virtu or Intel Rapid Start, then these are disabled by default and need to be changed here. The two main sub-menus to look at are related to fan controls via the Hardware Monitor menu and fast boot options in Windows 8 Configuration.
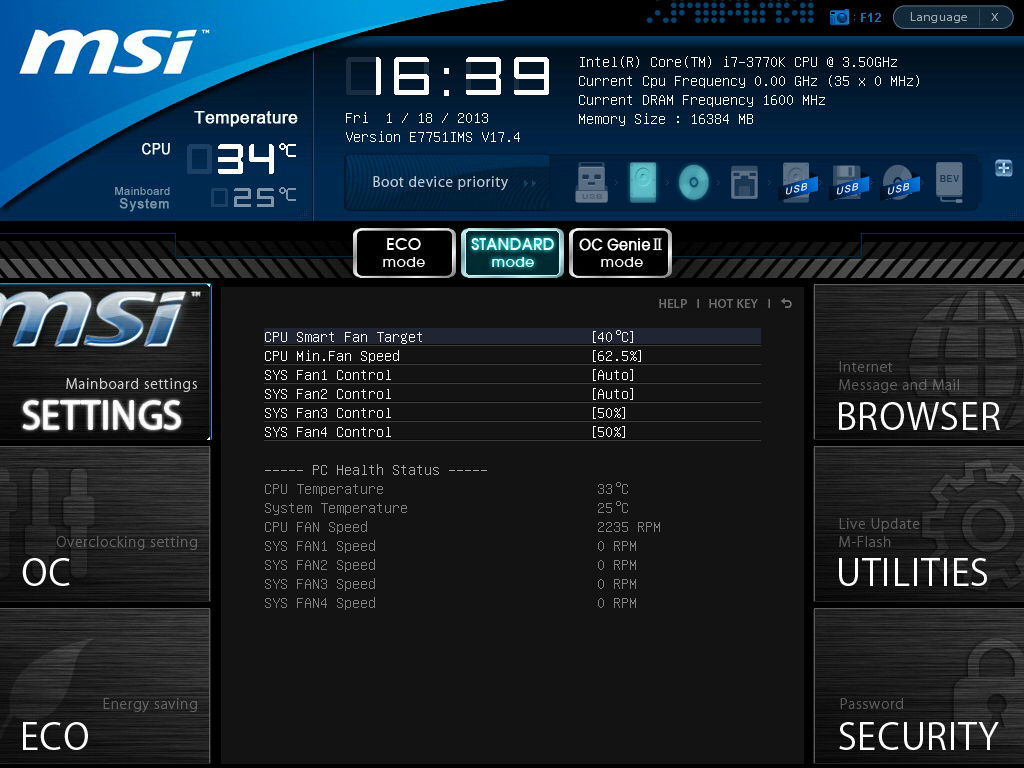
The fan options in the BIOS allow the user to control all the fans, however the options are basic compared to those in the operating system. The CPU fan is a ‘Smart Target’ where the user can choose a target temperature and a minimum fan speed. If the CPU goes over the temperature, the CPU fan will spin up to 100% in order to reach the target temperature again and then power down. The other fan headers get merely percentage options with no connection to system temperatures.
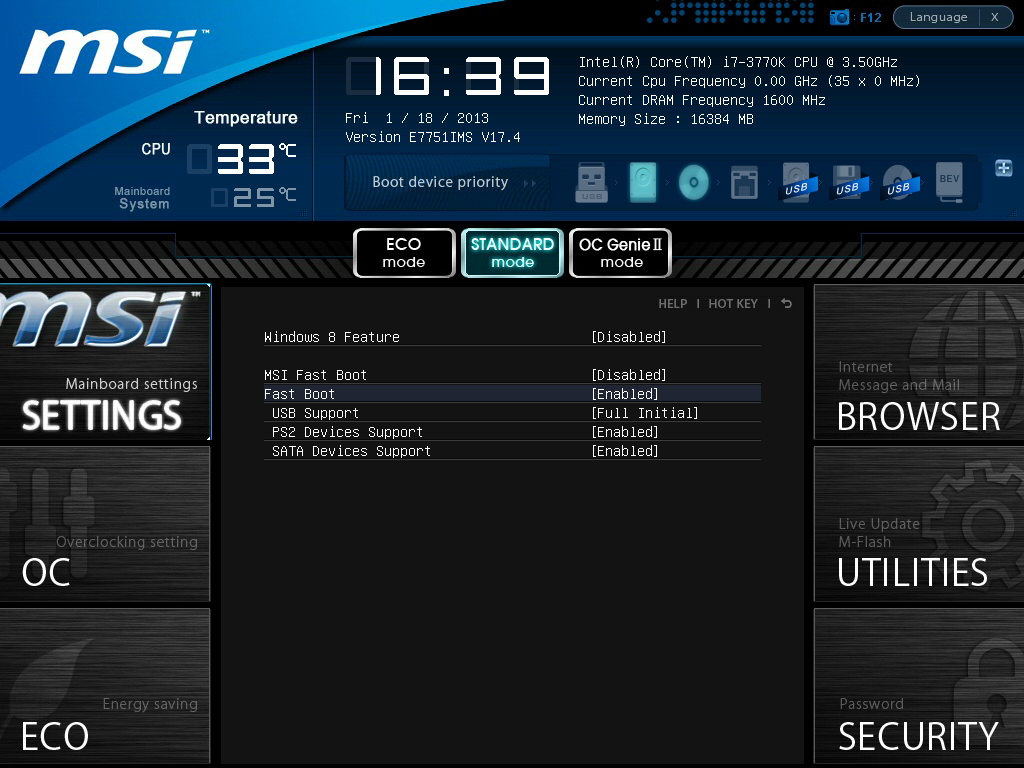
The Windows 8 Configuration options are our fast boot methods, and users of Windows 8 can take advantage of the benefits that the Windows 8 bootloader allows. For non-Win8 users, we can still disable things like USB/PS2 support at boot, which should encourage a faster boot at the expense of not being able to use the keyboard/mouse/USB until an operating system has loaded. Despite these options, I saw no difference in boot speed on Windows 7, with the default and stripped BIOSes still needing ~12.75 seconds to POST.

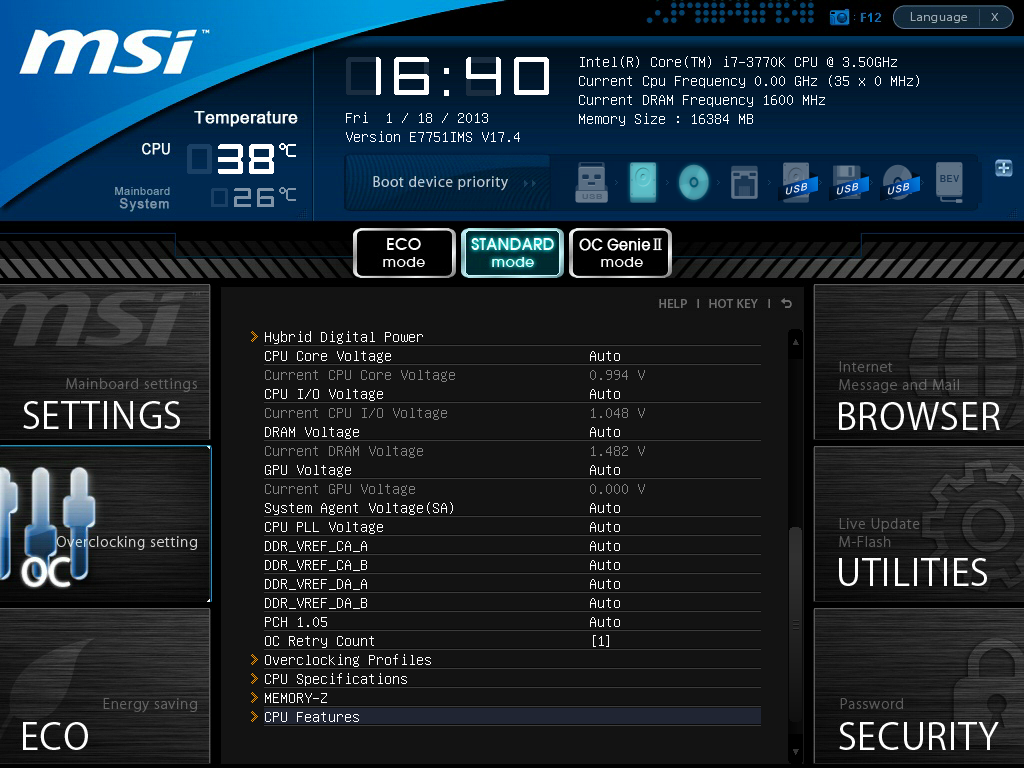
Moving on to the overclocking options and it seems like MSI have dropped the ball quite severely. There is no real order or layout to our functionality, except in the sense that we start at CPU frequency, then turbo options, memory, power, voltages, and finally miscellaneous options. There are no headers, no explanations about the limits of the options or even what the options do. Anyone not familiar with the latest Core architecture will not have a clue what the ‘Internal PLL Overvoltage’ is, or if it is relevant to their processor. In fact there are still some options that leave me stumped, especially in the Hybrid Power menu:
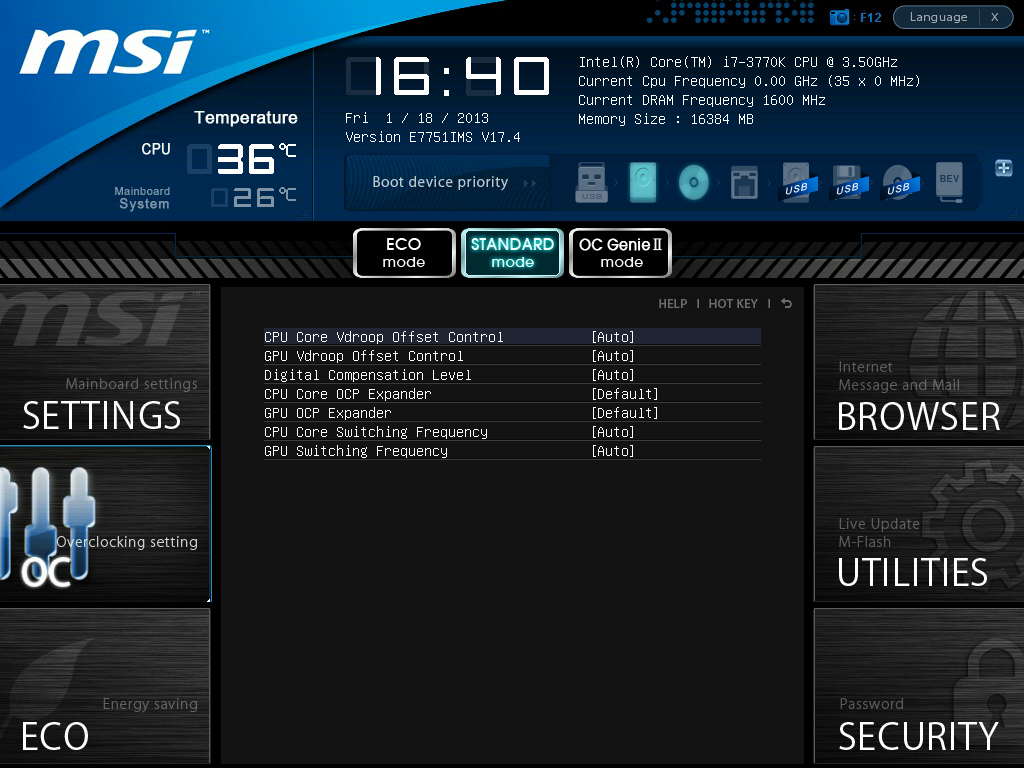
We can essentially interpret the OCP and switching frequency options which are common overclocking terminology, however the VDroop option gives values between 0% and +100% in 12.5% increments. This is in itself odd, and the BIOS does not tell you whether you want 0% or 100% for constant voltage. Does 100% mean you get 100% all the time, or that it drops 100% of the voltage at full load? The Digital Compensation Level option is just as erratic, as it does not tell you what it is compensating or what you want for a good overclock.
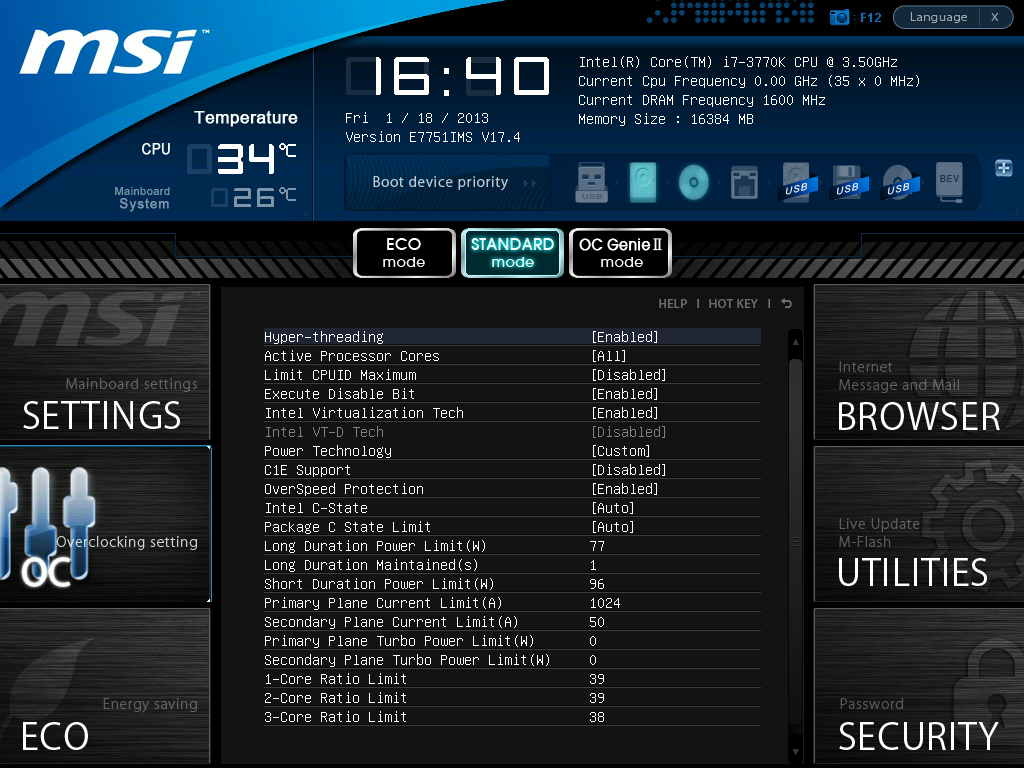
Power limits are all found in the CPU Features menu at the bottom of the main OC menu, although again we get no explanation here of anything. The Power Limits are limited to 255 W, despite the fact that other motherboards give higher power limits on their auto overclocks, and a processor can breach 400W while heavily overclocked on sub-zero cooling.
Elsewhere in the BIOS it should be stated that there are issues dealing the overclocking profiles when using any public BIOS below the V17.6 – even numbered OC profiles seem to be borked, either not saving properly or recalling values from different save files. It seems to be fixed with V17.6 though.


MSI Z77 MPower Software
It is hard to pinpoint the perfect software to complement a motherboard. In a normal environment the software should look nice and work flawlessly, but in an ideal environment it could be tricky to decide what functionality should be there, and what form it would take. Over the past year MSI have used the MSI Control Center as their main detailed interface, and is now combined with MSI Suite as an attempt to roll all the individual programs into one interface access. For the most part, this works quite well.
Everything starts with the Driver CD interface, which MSI has not updated since I started reviewing their motherboards (see an older P67 review). The drivers and utilities are in two separate menus, each with separate buttons for different sections, or a ‘Total Installer’ button. Clicking this gives a check box list of everything available to install, and the user can deselect options they do not want.
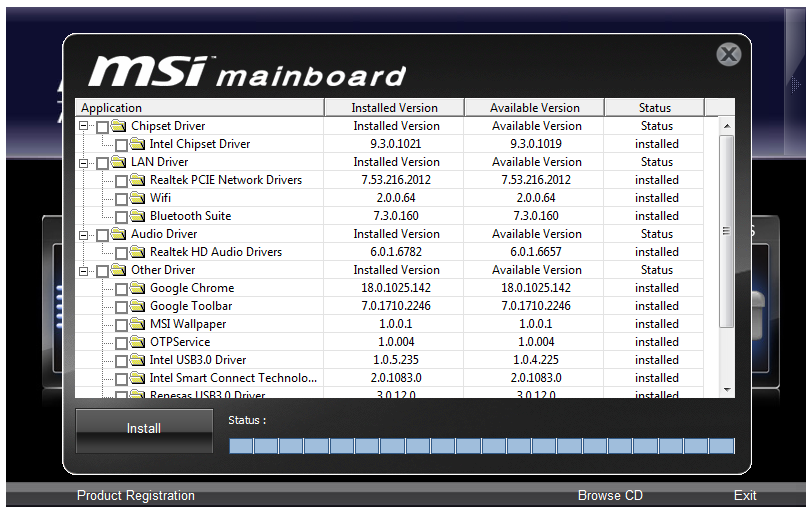
The system will then silently install everything selected and reboot the system accordingly. The only things missing from this endeavor are descriptions of what each bit of software is – for example in the picture above, ‘OTPService’ is clearly not a descriptive term.
However after installing the drivers and software, we are good to go. The first thing we notice on reboot is MSI Suite, which greets us with an annoying error – if you did not install Trend Micro SafeSync as part of the package, it suggests that you install it every single time the system reboots. This is quite frankly annoying and somewhat abusive.
MSI Suite
The MSI Suite interface starts as a button on the top of your desktop, which when clicked gives you the menu below. It caters for the majority of the MSI Software (not the latest additions), which from left to right are: SuperCharger, ClickBIOS, Control Center, Audio Genie, Video Genie, Teaming Genie, Live Update and EasyViewer.

The options menu for MSI Suite allows for other utilities to be added as well. Aside from the aforementioned issue regarding Trend Micro SafeSync, MSI Suite looks good and offers quick interaction with the MSI tools.
MSI SuperCharger
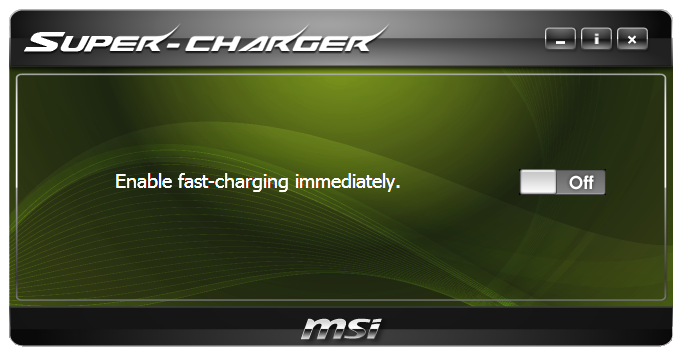
MSI, like most motherboard manufacturers, implement a form of fast charging. In the case of MSI it comes via a specific USB 2.0 header on board, allowing up to 1.5 A current draw depending on the device, as well as charging under S5 (off). MSI advertises this feature for iPads, iPhones and ‘mobile’ devices; however it would seem to be dependent on whether your device supports the BC1.1 charging standard, and the device may not feel the full 1.5A.
MSI ClickBIOS II
As mentioned in the BIOS section of the review, depending on what version of the BIOS you are using, the latest version of ClickBIOS II will warn you every time if you do not have Intel ME8 flashed onto the system.
Every mainstream motherboard manufacturer is delving into the abilities to change the BIOS settings on the fly in the operating system. In an effort to bring continuity to the table, MSI’s utility is called ClickBIOS II and is designed to look like the BIOS itself, with a few minor changes. Firstly the fonts are slightly different, given that in the OS there is more scope for definition, but also the layout of the options has been adjusted slightly to give a ‘Help Info’ box, something desperately lacking in the main BIOS. In ClickBIOS II, we can go through the majority of the options found in the BIOS, however some adjustments will require a reboot to take effect.
MSI Control Center
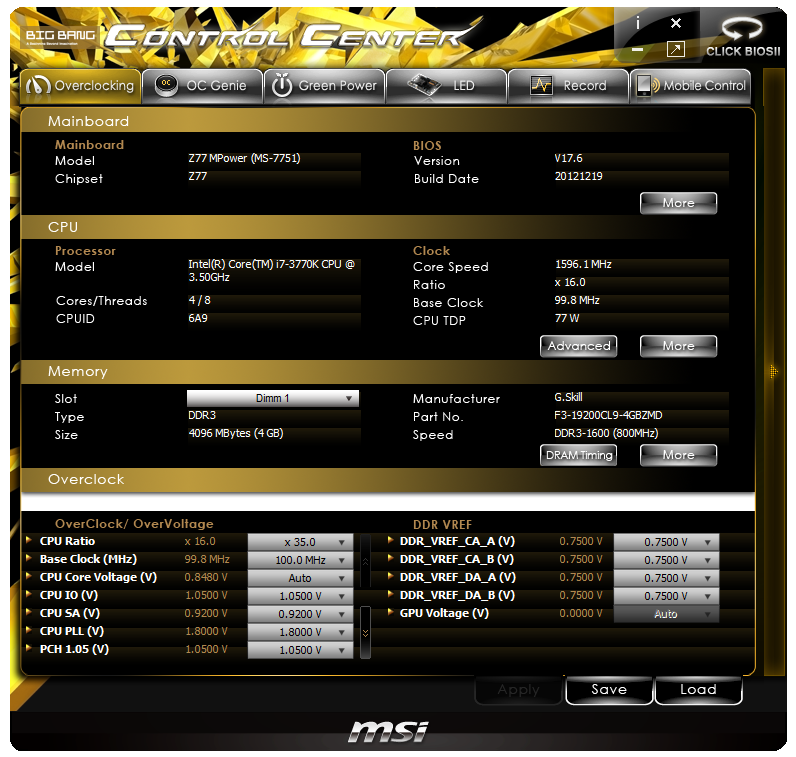
The hub of the action in software comes from MSI’s Control Center, giving us info, overclocking options, power options, recording facilities, fan controls and mobile interfaces. Despite the official lack of ‘Big Bang’ in the motherboard name, we are greeted with a yellow and black skin which is actually pleasing on the eyes. The first page, entitled ‘Overclocking’, gives the information for the motherboard, the CPU, the memory, and voltage options.
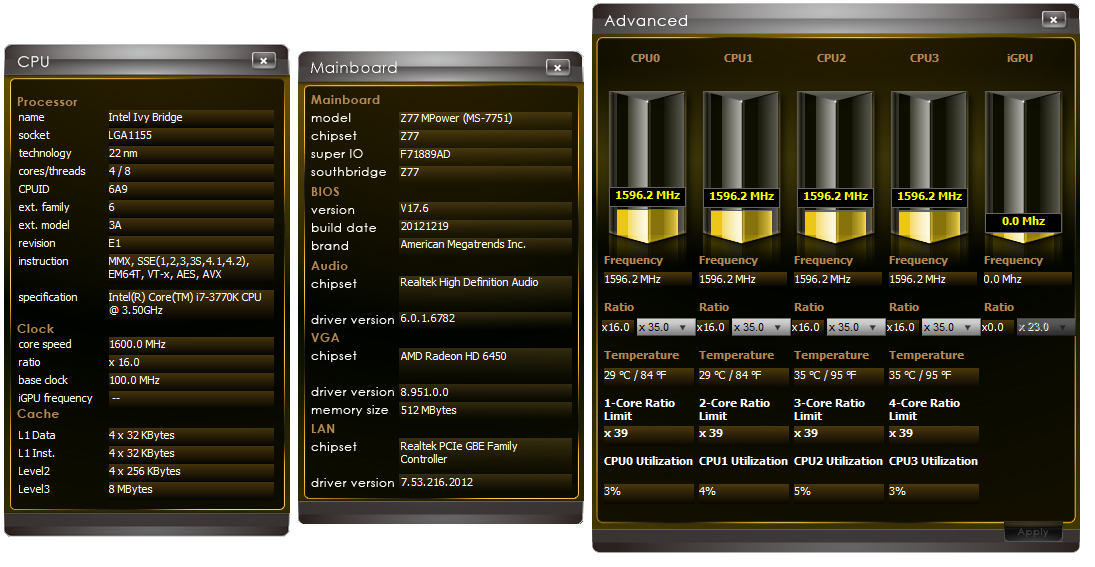
Moving into the sub-menus supplies more information, with the ‘Advanced’ option allowing users to decide on CPU ratios per core. As shown in the advanced menu under ‘Core Ratio Limits’, the Z77 MPower uses a form of MultiCore Enhancement/Acceleration/Turbo to give the top turbo multiplier no matter the how much the CPU is pushed.
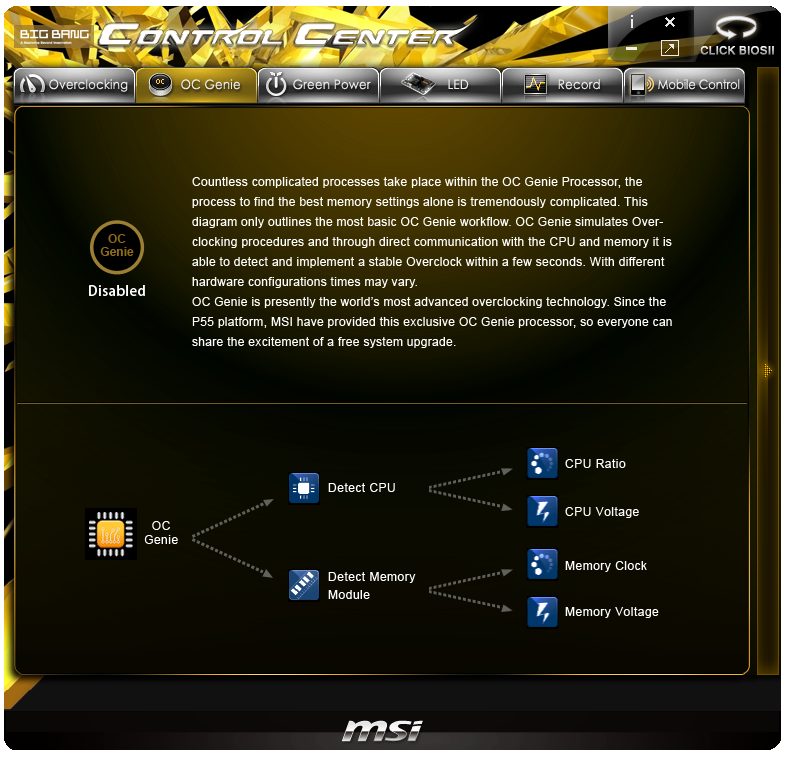
The OC Genie menu gives a one button click for the OC Genie options defined in the BIOS. At default settings this gives 4.2 GHz on the CPU and XMP ‘minus one strap’ on the memory (e.g. for 2400 memory, it gives 2133) and requires a reboot.
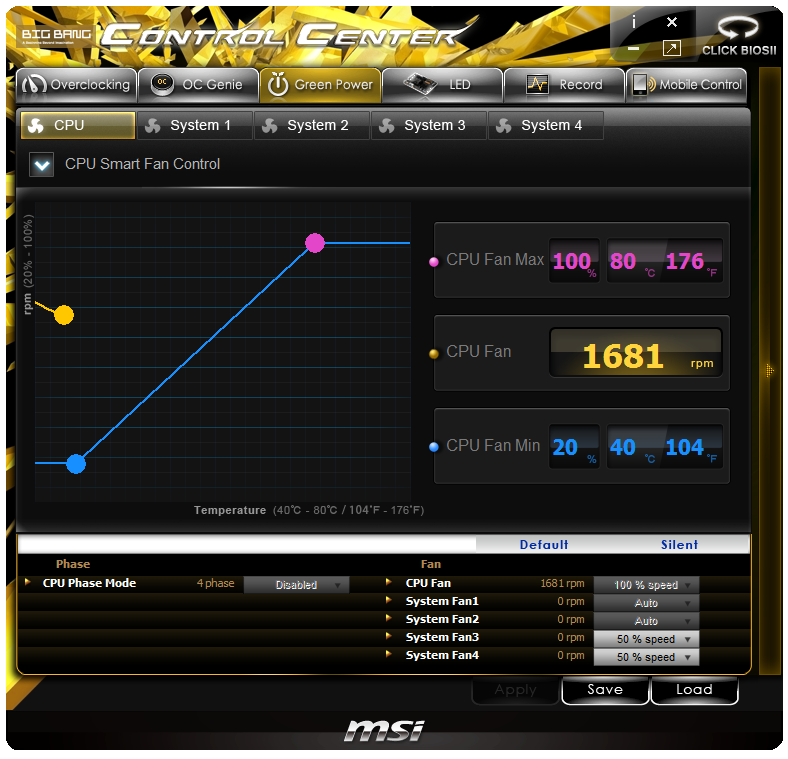
The OS fan controls are in the Green Power menu, and allows for each of the five fan headers a simple two-point gradient to be adjusted. Having this sort of visual functionality in the software is great, however MSI fall into a big trap. The software allows the user to adjust power to the fan, rather than the fan RPM – this is important power-to-RPM graphs for fans are not completely linear. Take for example the fan I used for this review, which follows the following profile:
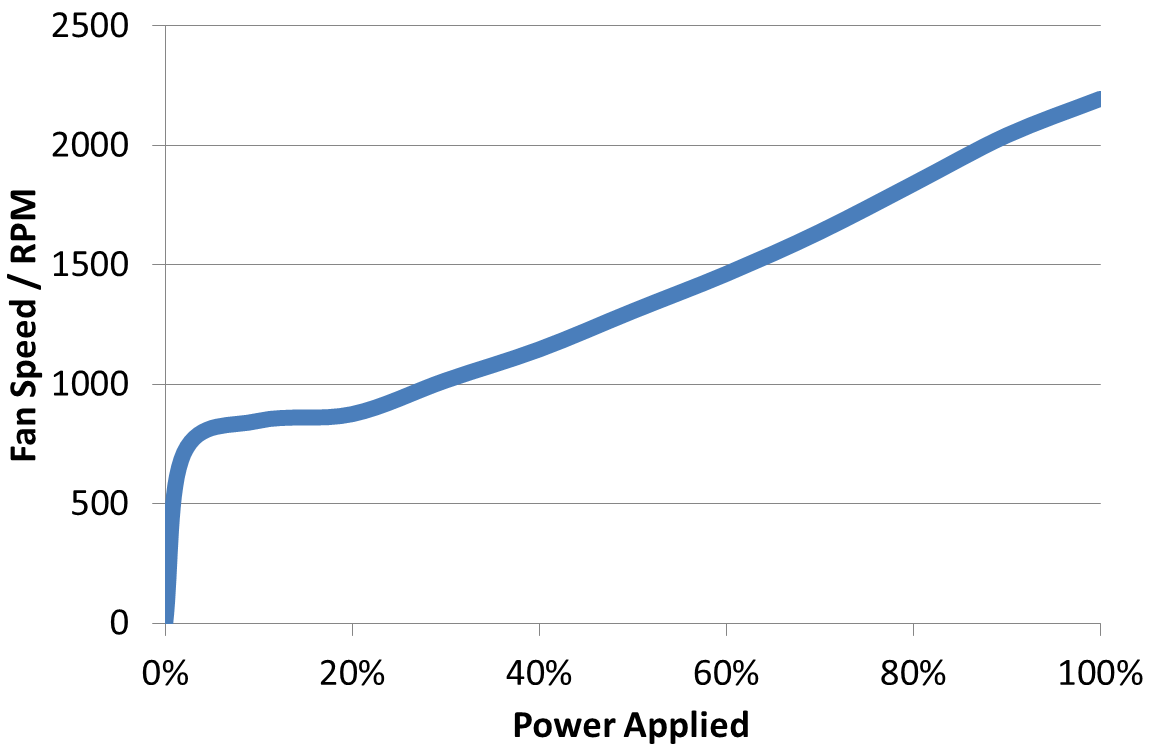
Below 20% power applied, the fan spins at ~800 RPM, which is not taken into account in the MSI fan software. At 100%, the fan spins at ~2200 RPM, and at 50% this is 1300 RPM, not 1100 RPM as would be predicted with a directly linear power-to-RPM profile. When software developers start realizing this (some already have done), then we are on the road to proper sets of fan controls.
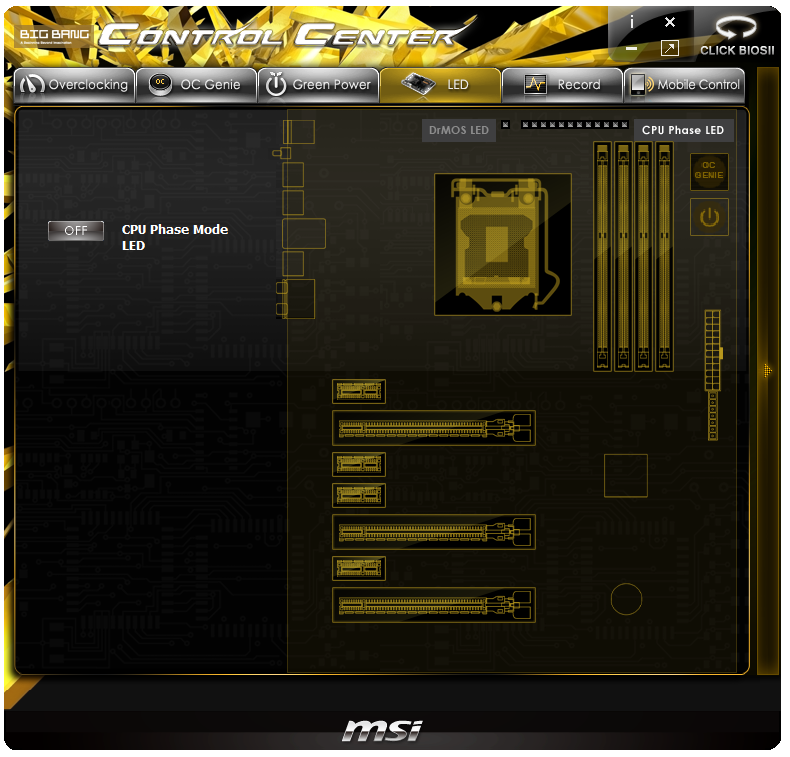
Another feature in the Control Center software is to turn off the blue CPU Phase LEDs on board. During normal operation they do flicker a lot, can be bright, and might upset a certain case/system build based around a color other than blue. If I had to leave a system like this on overnight for processing in the room that I slept in (such as a student or in a studio flat), I would probably be annoyed at the constant flickering of these LEDs.
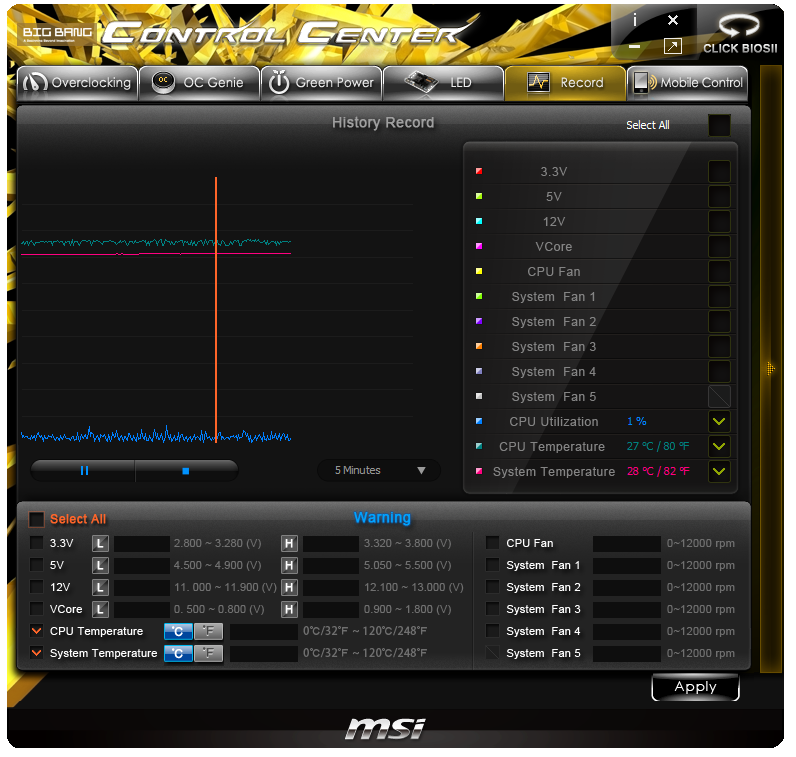
The recording software is something I have liked about MSI and some other vendors as it gives options of what to follow, over what time, the ability to give system alerts when it goes over a certain value, and each graph line has its own normalized height function. Another positive feature is that the software does not affect DPC Latency, compared to some of the other implementations seen on the motherboard market.
MSI Mobile Control
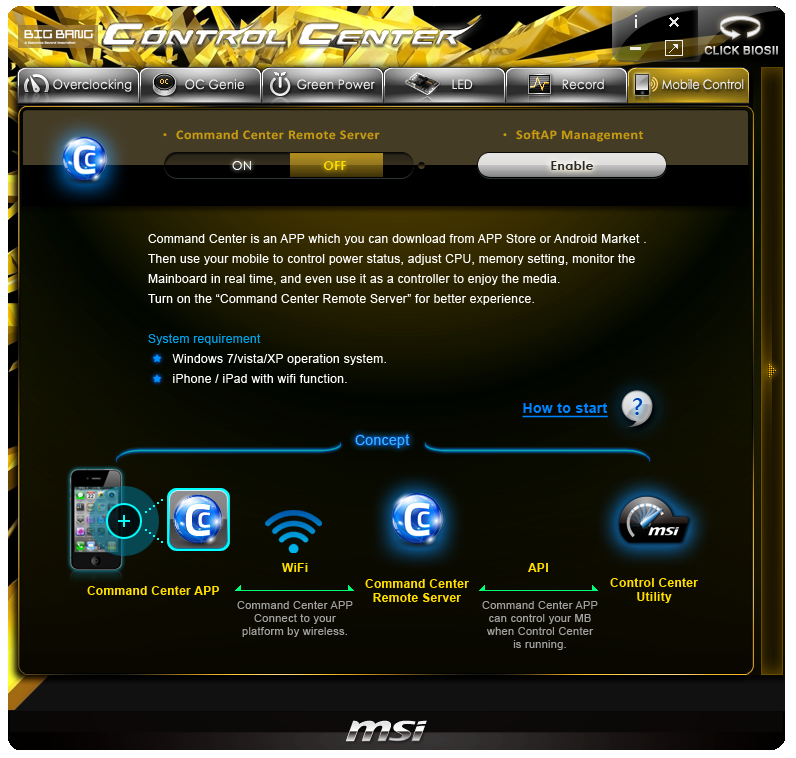
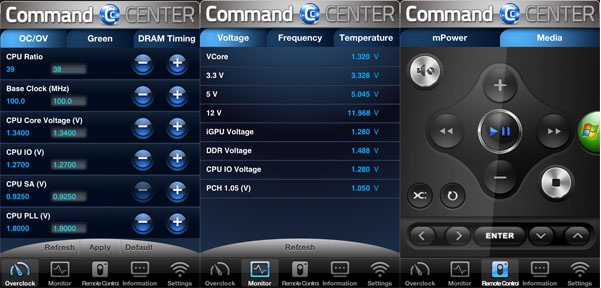
The last piece of the Control Center software is in Mobile Control, which allows a user to access overclocking controls, fan/temperature sensors, and a remote control through their smartphone. The app is available on both iOS and Android, and it attempts to connect to a Control Center server which initializes on your system when enabled in the software. The app looks for a response on a specific IP (the server icon on the taskbar, when clicked, will tell you the IPs it listens to) and will connect via that. I unfortunately could not get it to work, either via my convoluted ICS setup or when the MSI Z77 MPower was connected to my main DHCP router via the WiFi.
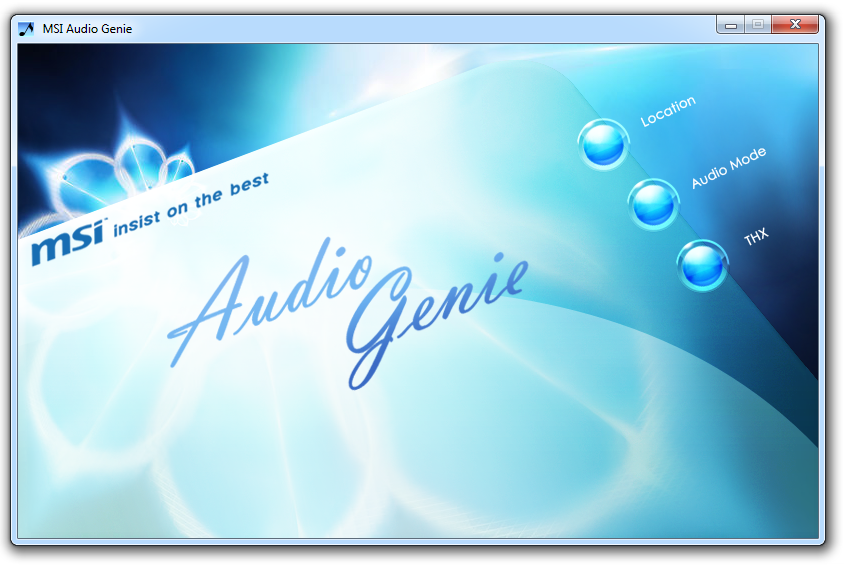
MSI Audio Genie
The Audio Genie software is designed to give the user a different interface for the Creative THX TruStudio PRO software, and help optimize the on board audio setup. Alternatively the native THX TruStudio Pro software is still available for download from the MSI website, where MSI no longer advertise Audio Genie as a specific feature of their motherboards.
MSI Video Genie
Another MSI software element that is no longer advertised on the main website is Video Genie. The software manual states that this software ‘provides the automatic color saturation enhancement, contrast enhancement and intelligent gamma correction – Video Genie not only improves the quality of static images, the video playback will be dramatically enhanced’. As a bit of software, it runs panel agnostic and attempts to adjust the OS controls to optimize low brightness areas for videos and games. Ultimately usage and preference may vary, but the software is a simple on/off switch.

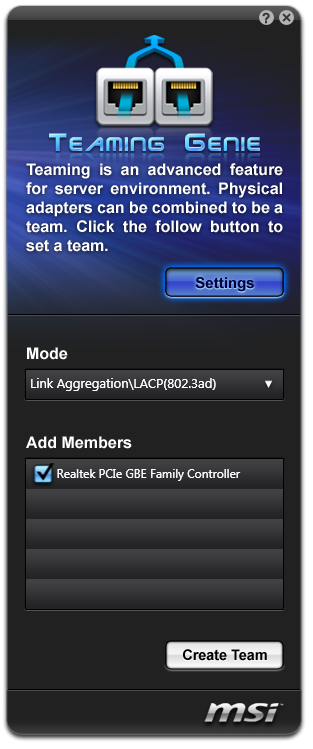
MSI Teaming Genie
Using two network ports together in a single system to increase bandwidth between clients has been part of the Ethernet specification for a long while now, and requires a form of software activation to enable it, as well as an applicable router/switch/DHCP client that can handle the settings. MSI have for a long time included Teaming Genie as part of their package, and allows users to select multiple Ethernet connections to work as one, even if the motherboard (like the MSI Z77 MPower) only has one Ethernet port on board. In order to take advantage of Teaming Genie, users will have to add in their own network interface cards.
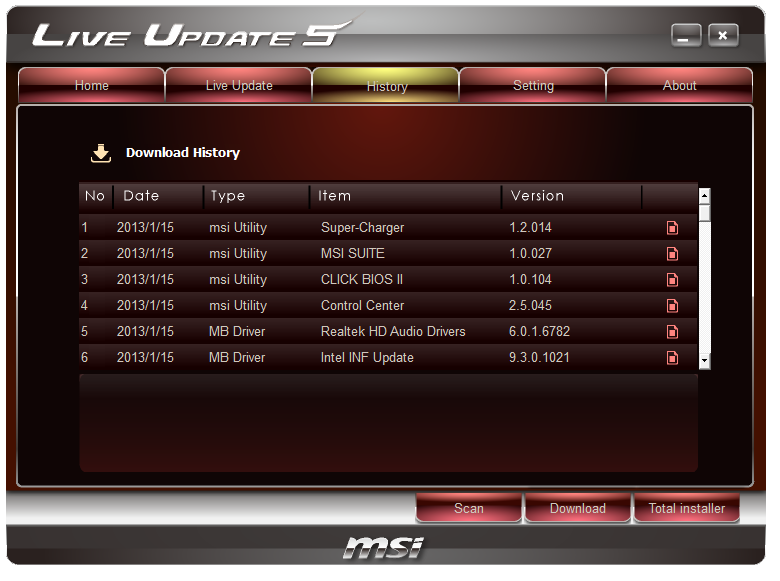
Live Update 5
One of the jewels in the crown of the MSI software setup is Live Update 5, currently unrivalled by any motherboard manufacturer. What we have is an automatic update system for all the drivers, software, and even the BIOS for the motherboard. On installing, it asks if you would like to update to the latest version of LU5, and then it checks regularly with MSI’s servers to see if anything new is there for you.
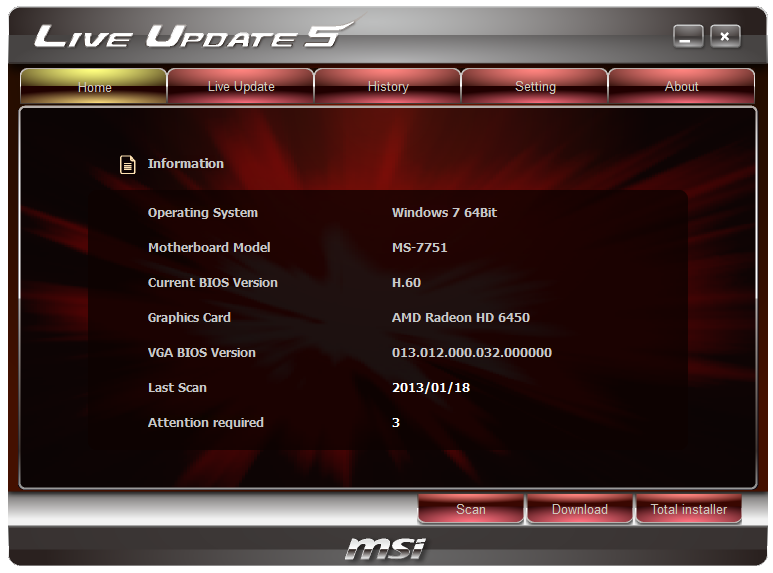
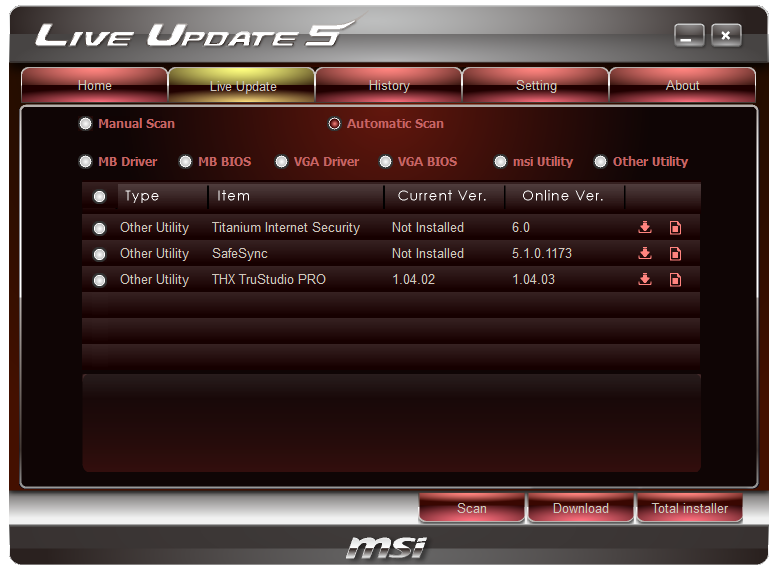
Previous versions were a little annoying, whereby the software would not tell you the size of the update, meaning that those 150 MB of audio drivers were just labeled as ‘audio drivers’ and there was no suggestion as to how long the download and install would take place. MSI have gone someway to remedy this by informing the user how big the file is while it is being downloaded. All we need now is that information actually present in the table above, and all is well. By being on the wave of the latest MSI has to offer, users should stay ahead of any feature changes by the various software and drivers, which is not always applicable on other motherboards where it is standard to merely install the CD drivers and leave it at that unless an error crops up.
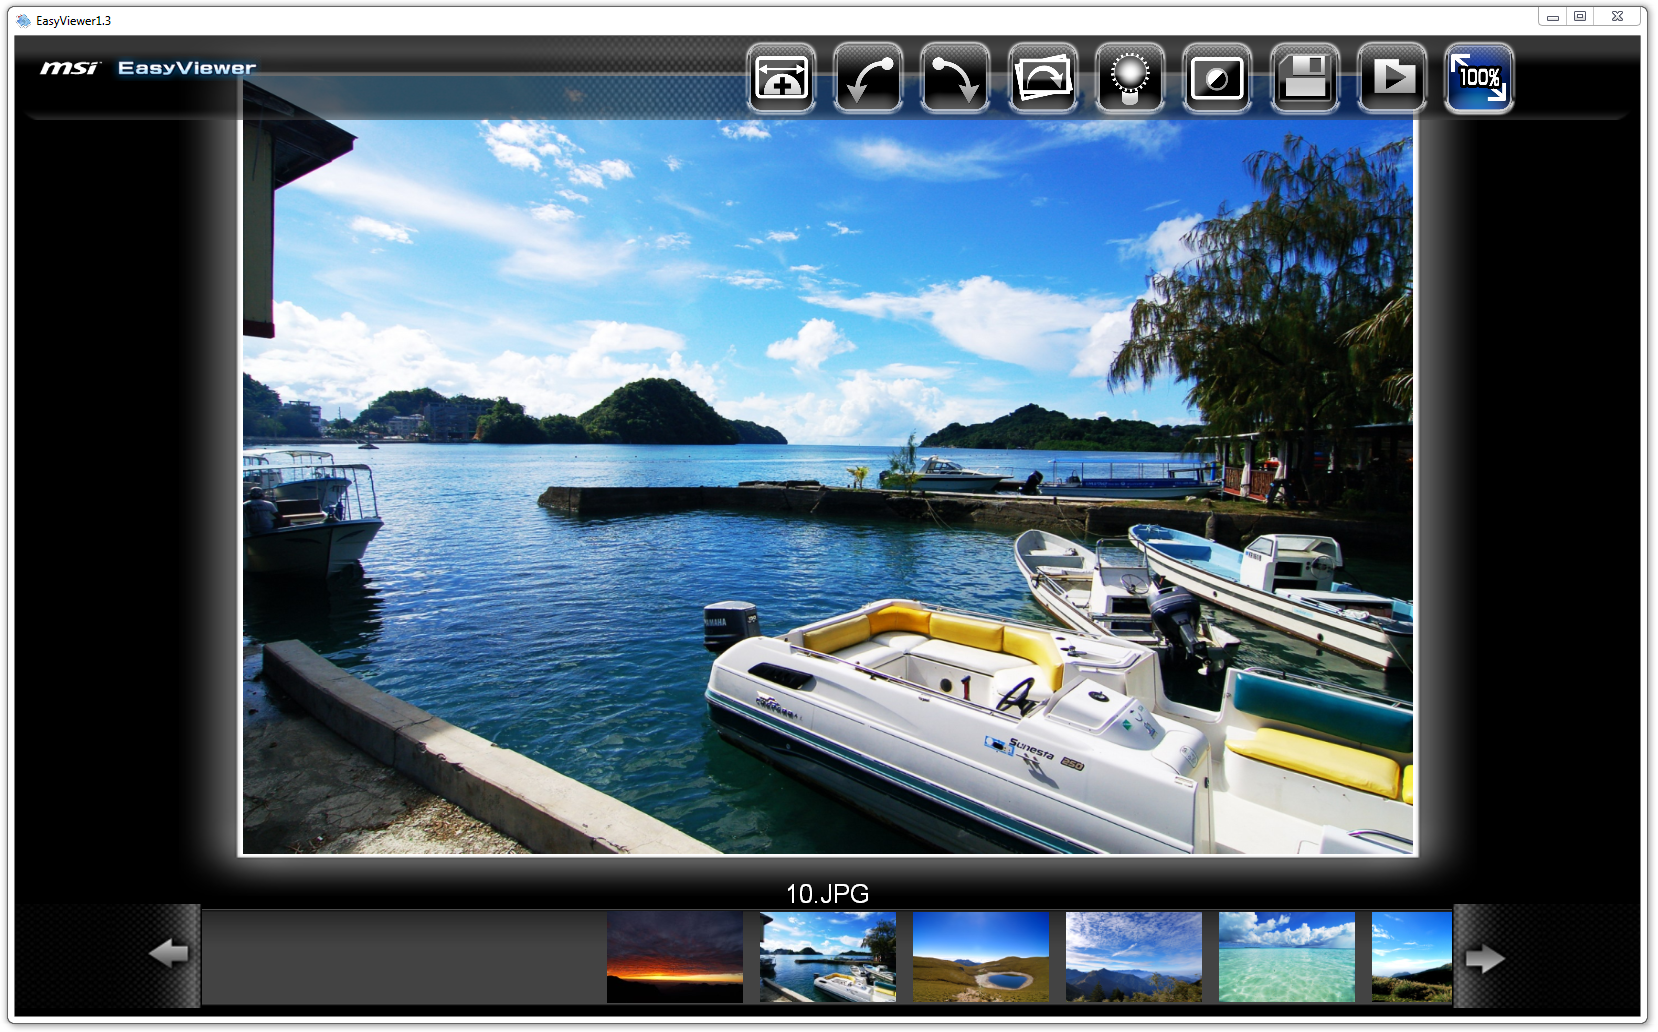
MSI Easy Viewer
Have you ever thought to yourself that the standard Windows image viewer application needed an update? Me neither, but MSI is under the impression it needs a touch up in the form of MSI Easy Viewer. The software lets the user do simple rotation and lighting tasks, as well as view the image full screen or swipe through the images in the same folder. Personally I actually use FastStone Image Viewer as my quick image viewer and editing app, as well as a benchmark in our testing suite.
Network Genie
When a vendor purchases Realtek components, there are various software packages that they also have the option to gain the license to. MSI takes them up on this offer, especially with regards the network ports, and we get an MSI skinned version of Realtek’s Network Genie. This is similar to cFosSpeed that we see on ASRock boards or Network Control on ASUS in that the user can select different modes to give various applications priority on network bandwidth.
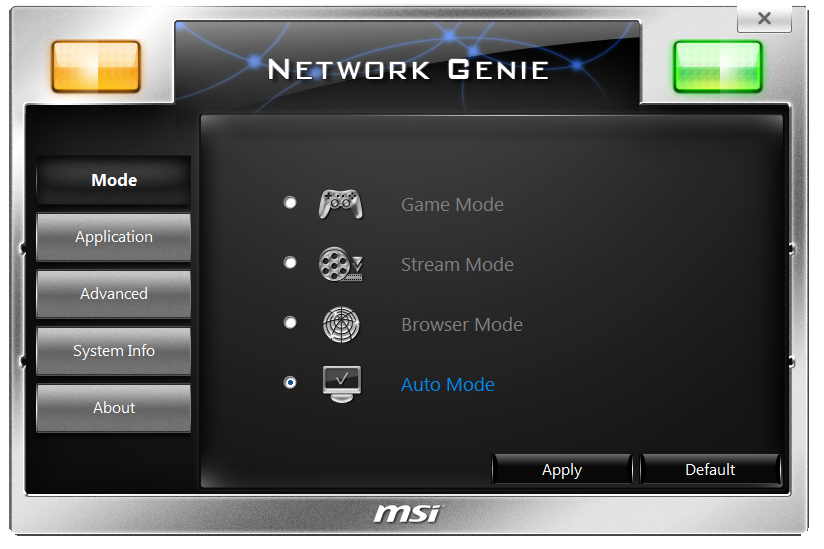
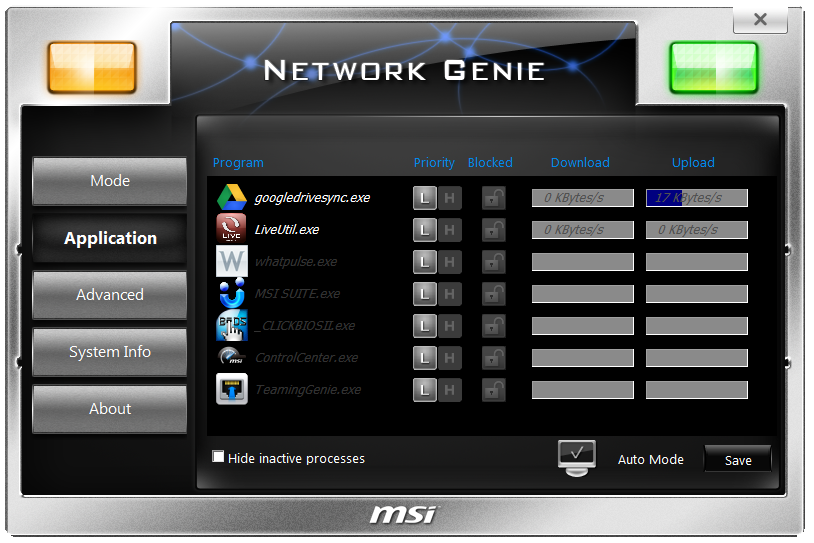
This means that gamers can place the VOIP software and game at a higher priority than their email client or messaging applications. Unlike the other tools mentioned, we do not get a bandwidth limiter (for people on fixed usage plans) or a graphical interface to see usage over time.
MSI Fast Boot
If a user feels uncomfortable going into the BIOS to change the fast boot options, or the motherboard is in a case and users cannot access the Go2BIOS button, MSI have provided a software interface for both. It doesn’t get much simpler than this.


MSI Z77 MPower In The Box
When dealing with a $210 motherboard, we expect some form of goodies to be included above the standard SATA cable inclusion. Previous reviews of cheaper motherboards have often included USB 3.0 panels or awesome antenna solutions for the integrated WiFi, or for a little more we have seen plastic standoffs for quick out of the box overclocking, power cables, and various multi-GPU bridges. It will be interesting to see what MSI can provide.
In the box we get:
Driver CD
Rear IO Shield
MSI Software Guide
MSI Mainboard User Guide
MSI Quick Installation Guide
MSI Overclocking Guide
Four right angled, locking SATA cables
A 3-slot Flexi-SLI bridge
A WiFi Antenna and base extension
M-Connectors (for the front panel headers)
Four V-Check Cables
Aside from all the guides included (which are surely a pretty penny themselves), the WiFi antenna is quite small (2.25 inches / 57.15mm) and the length of the cord for the base extension is just enough to put it on top of a case. The M-Connectors and V-Check cables are a nice addition, and four SATA cables makes sense with only six SATA connections on board - but I cannot help feeling that we are missing something. What the package needs is a MSI Z77 MPower branded peripheral (USB 3.0 Front Panel?) to separate it from all the normal stuff that is thrown into a motherboard package.
MSI Z77 MPower Overclocking
Note: Ivy Bridge does not overclock like Sandy Bridge. For a detailed report on the effect of voltage on Ivy Bridge (and thus temperatures and power draw), please read Undervolting and Overclocking on Ivy Bridge.
Experience with MSI Z77 MPower
After a positive experience in our last Z77 review with our new i7-3770K chip, I was hoping for something similar enough from the Z77 MPower. As always with Ivy Bridge, our limit always seems to lie with the processor cooling rather than the motherboard itself when dealing with air/water overclocking.
The Z77 MPower has an middle-of-the-road one-button overclock, limited automatic overclock options, a confusing array of BIOS options to actually perform an overclock, frustrating BIOS flashing/repair, and relatively poor BCLK overclock performance, hitting 105 MHz only on our sample despite other users obtaining higher results. But it did hit 5.0 GHz stable on our processor with relative ease, thanks to the blast of some cold outside air while testing at 2AM next to an open window, and was very comfortable running our DDR3-2666 C11 kit at DDR3-2800 C11 with no change in the voltage, just a change in memory strap.
Methodology:
Our standard overclocking methodology is as follows. We select the automatic overclock options and test for stability with PovRay and OCCT to simulate high-end workloads. These stability tests aim to catch any immediate causes for memory or CPU errors.
For manual overclocks, based on the information gathered from previous testing, starts off at a nominal voltage and CPU multiplier, and the multiplier is increased until the stability tests are failed. The CPU voltage is increased gradually until the stability tests are passed, and the process repeated until the motherboard reduces the multiplier automatically (due to safety protocol) or the CPU temperature reaches a stupidly high level (100ºC+). Our test bed is not in a case, which should push overclocks higher with fresher (cooler) air.
Automatic Overclock:
In comparison to the ASRock Z77 OC Formula with its 11 different automatic overclock options, the MSI Z77 MPower offers a single option in two different locations. This is the OC Genie, which can be enabled by the onboard button, or by the Control Center software in the operating system. The settings for OC Genie can be modified in the BIOS, but here we test what MSI have deemed ‘safe’.
Under this OC Genie setting the CPU is put up to 42x on the multiplier, which due to the BCLK on BIOS 17.6 results in a total speed of 42x99.77 = 4190 MHz (on earlier BIOSes, such as 17.4, the base BCLK was 100.5 MHz). The setting also gave our 2400 C9 memory a bump from the base 1333 C9 to 2133 C9, suggesting an ‘XMP minus one’ setting. All other options in the BIOS were left unchanged by the OC Genie, and this resulted in a load CPU voltage in the OS of 1.072 V. The overclock passed PovRay and OCCT, hitting 63ºC as a peak temperature. It should be noted however that in this setting, the system would not reduce down the multiplier for idle mode.
This overclock seems a little low, especially as MSI touts that every MSI Z77 MPower built has to pass a CPU stress test for 24 hours running Prime95 and with a 30% overclock (no idea on numbers, but that puts a 3770K at 4.55 GHz) using a low airflow closed loop cooler. But MSI have no guarantee what cooling is used by the end-user, and thus the Intel stock cooler may have issues in hot environments at 4.2 GHz.
Manual Overclock:
For manual overclocking, everything was performed in the BIOS due to the issues with Control Center and the Intel ME version. The settings are all in the OC Menu:
Based on previous overclocking experiences, we adjusting the settings for all overclocks as follows:
CPU Core VDroop Offset Control: +100%
Digital Compensation Level: High
CPU Core OCP Expander: Enhanced
CPU Core Switching Frequency: 2x
Power Limits: 255W
To start we put our system at a multiplier of 44x and raise the CPU Voltage to 1.100 volts, and test for stability using OCCT for five minutes as a CPU temperature indicator, and then PovRay benchmark mode to look for memory errors. Our results are as follows:
Hitting that 50x mark is a great achievement, although setting 1.475 volts in the BIOS for a 3770K is fairly extreme for either air or water cooling. I would not be happy running it at that for day-to-day usage – 47x seems like a good sweet spot.
Many thanks to...
We must thank the following companies for kindly donating hardware for our test bed:
OCZ for donating the 1250W Gold Power Supply and USB testing SSD
Micron for donating our SATA testing SSD
G.Skill for donating our memory kits
ASUS for donating AMD GPUs and some IO Testing kit
ECS for donating NVIDIA GPUs
Test Setup
Power Consumption
Power consumption was tested on the system as a whole with a wall meter connected to the OCZ 1250W power supply, while in a dual 7970 GPU configuration. This power supply is Gold rated, and as I am in the UK on a 230-240 V supply, leads to ~75% efficiency > 50W, and 90%+ efficiency at 250W, which is suitable for both idle and multi-GPU loading. This method of power reading allows us to compare the power management of the UEFI and the board to supply components with power under load, and includes typical PSU losses due to efficiency. These are the real world values that consumers may expect from a typical system (minus the monitor) using this motherboard.
While this method for power measurement may not be ideal, and you feel these numbers are not representative due to the high wattage power supply being used (we use the same PSU to remain consistent over a series of reviews, and the fact that some boards on our test bed get tested with three or four high powered GPUs), the important point to take away is the relationship between the numbers. These boards are all under the same conditions, and thus the differences between them should be easy to spot.
Interestingly one of the best points about the Z77 MPower is the power consumption. It takes the top spot in all our loading tests, showing that OC oriented boards (like the MSI and ASRock Z77 OC Formula) are actually rather power efficient.
Windows 7 POST Time
Different motherboards have different POST sequences before an operating system is initialized. A lot of this is dependent on the board itself, and POST boot time is determined by the controllers on board (and the sequence of how those extras are organized). As part of our testing, we are now going to look at the POST Boot Time - this is the time from pressing the ON button on the computer to when Windows starts loading. (We discount Windows loading as it is highly variable given Windows specific features.) These results are subject to human error, so please allow +/- 1 second in these results.
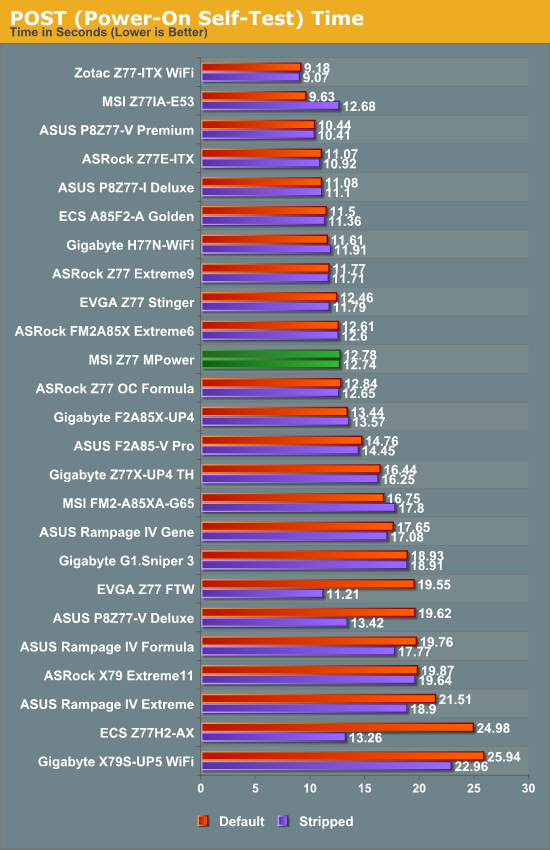
While nothing improved for the boot time when we selected Fast Boot options, the Z77 MPower misses out on our artificial ‘12 second is a good POST time’ mark by under a second.
Rightmark Audio Analyzer 6.2.5
In part due to reader requests, we are pleased to include Rightmark Audio Analyzer results in our benchmark suite. The premise behind Rightmark:AA is to test the input and output of the audio system to determine noise levels, range, harmonic distortion, stereo crosstalk and so forth. Rightmark:AA should indicate how well the sound system is built and isolated from electrical interference (either internally or externally). For this test we connect the Line Out to the Line In using a short six inch 3.5mm to 3.5mm high-quality jack, turn the OS volume to 100%, and run the Rightmark default test suite at 48 kHz, 96 kHz and 192 kHz. We look specifically at the Dynamic Range of the audio codec used on board, as well as the Total Harmonic Distortion + Noise.
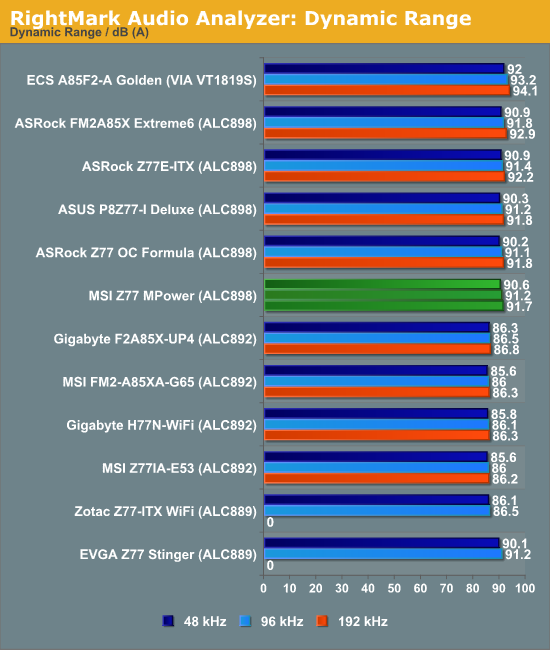
The MSI Z77 MPower uses a Realtek ALC898 audio codec which usually performs better than most standard solutions on our test, but MSI use no specific audio shielding in order to reduce electrical noise in the setup. As mentioned previously, the MSI Z77 MPower is designed to appeal to gamers (as well as overclockers), and some gamers would appreciate a better audio codec on the board.
USB 3.0 Backup
For this benchmark, we run CrystalDiskMark to determine the ideal sequential read and write speeds for the USB port using our 240 GB OCZ Vertex3 SSD with a SATA 6 Gbps to USB 3.0 converter. Then we transfer a set size of files from the SSD to the USB drive using DiskBench, which monitors the time taken to transfer. The files transferred are a 1.52 GB set of 2867 files across 320 folders – 95% of these files are small typical website files, and the rest (90% of the size) are the videos used in the WinRAR test.
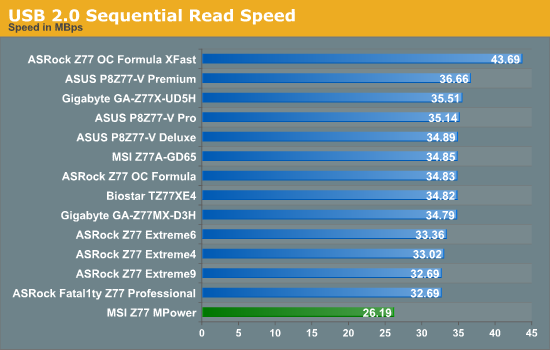
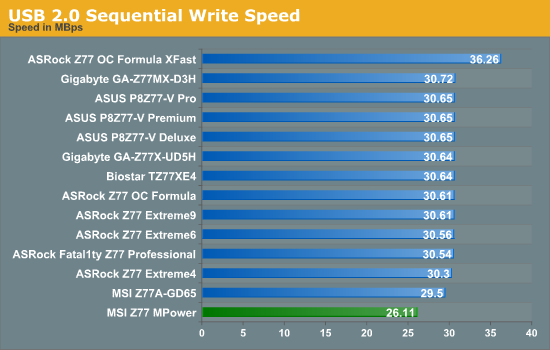
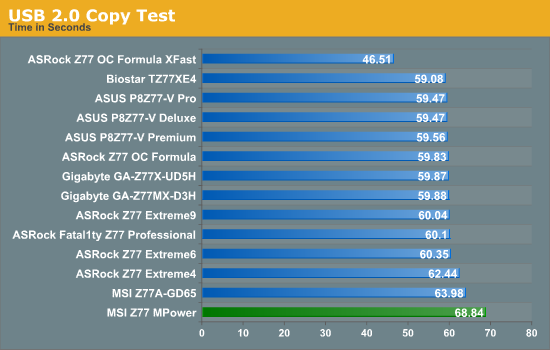
MSI have once again struck the floor with their USB 2.0 implementation. The Z77 MPower gets ~26 MBps compared to the 30-34 MBps of every other solution, which is similar to what we saw on the Z77A-GD65 at the Ivy Bridge launch. This is most likely down to their default BIOS settings and internal configuration.
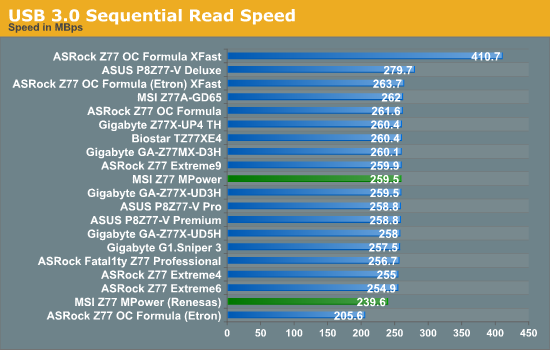
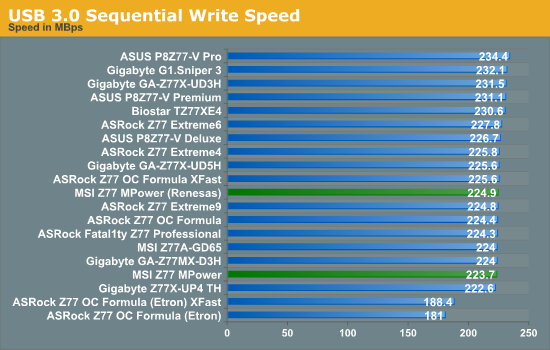
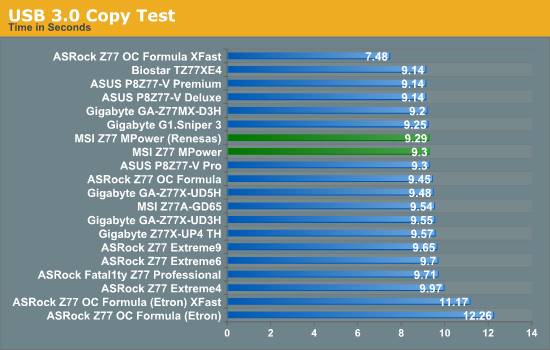
By comparison, the USB 3.0 implementation is pretty standard, and the Renesas controller used on board is up to the challenge, easily fitting in with the chipset USB 3.0 compared to the Etron used on the ASRock Z77 OC Formula.
DPC Latency
Deferred Procedure Call latency is a way in which Windows handles interrupt servicing. In order to wait for a processor to acknowledge the request, the system will queue all interrupt requests by priority. Critical interrupts will be handled as soon as possible, whereas lesser priority requests, such as audio, will be further down the line. So if the audio device requires data, it will have to wait until the request is processed before the buffer is filled. If the device drivers of higher priority components in a system are poorly implemented, this can cause delays in request scheduling and process time, resulting in an empty audio buffer – this leads to characteristic audible pauses, pops and clicks. Having a bigger buffer and correctly implemented system drivers obviously helps in this regard. The DPC latency checker measures how much time is processing DPCs from driver invocation – the lower the value will result in better audio transfer at smaller buffer sizes. Results are measured in microseconds and taken as the peak latency while cycling through a series of short HD videos - less than 500 microseconds usually gets the green light, but the lower the better.
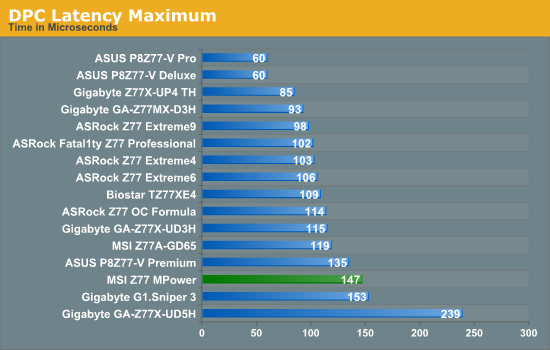
In our DPC testing, under 200 microseconds is a great result, and the Z77 MPower clearly comes in under that, although some of the competition have their head screwed on more and are diving below 100 microseconds.
Before starting with the CPU based benchmarks, a small issue related to the MSI Z77 MPower should be explained first. By default, every Z77 motherboard should aim for a BCLK of 100 MHz for the processor. This can vary by as much as 0.5 MHz depending on how the BIOS is written by the manufacturer, so 99.5 MHz to 100.5 MHz is not uncommon. (For completeness, it can also adjusted purposefully by the manufacturer for the aim to get more performance at a stock level.) Although it is a little rare for this BCLK number to switch between BIOS versions, as is the case with the Z77 MPower. On BIOS 17.4, the base BCLK is 100.5 MHz, whereas on 17.6 it is 99.77 MHz. At full turbo multiplier, this can be as much as 30 MHz difference, and is noticeable in CPU limited high throughput scenarios. For testing consistency, this motherboard was tested with the latest public BIOS at time of testing, which was 17.6.
It should also be noted that the Z77 MPower applies MultiCore Turbo under default + XMP settings, giving the CPU the highest turbo bin at full loading (39x at all core loads, rather than 39x/39x/38x/37x at 1/2/3/4 core loads as per Intel specifications). This is slowly becoming the norm with Z77, as expressed in our pipeline post ‘MultiCore Enhancement: The Debate About Free MHz’.
3D Movement Algorithm Test
The algorithms in 3DPM employ both uniform random number generation or normal distribution random number generation, and vary in various amounts of trigonometric operations, conditional statements, generation and rejection, fused operations, etc. The benchmark runs through six algorithms for a specified number of particles and steps, and calculates the speed of each algorithm, then sums them all for a final score. This is an example of a real world situation that a computational scientist may find themselves in, rather than a pure synthetic benchmark. The benchmark is also parallel between particles simulated, and we test the single thread performance as well as the multi-threaded performance.
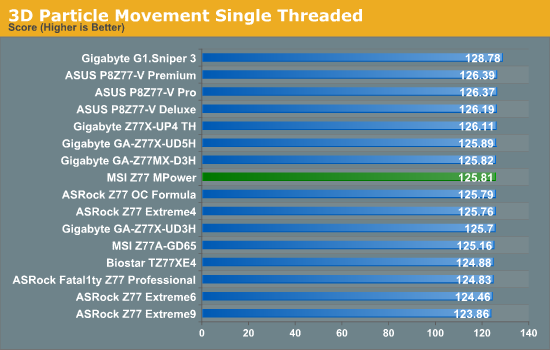
Everything seems normal on the single threaded speed on the Z77 MPower.
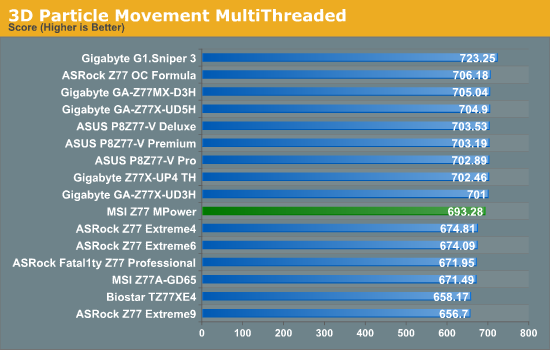
The multi-threaded test gives cause for concern – the Z77 MPower performs between the boards that enable MultiCore Turbo and those that do not. This makes me wonder if there are two sets of software that are trying to adjust the CPU speed on the fly, or MSI have not cracked the hysteresis when moving from full load to no-load, causing elements of the test to slow down.
WinRAR x64 3.93 - link
With 64-bit WinRAR, we compress the set of files used in the USB speed tests. WinRAR x64 3.93 attempts to use multithreading when possible, and provides as a good test for when a system has variable threaded load. If a system has multiple speeds to invoke at different loading, the switching between those speeds will determine how well the system will do.
WinRAR is often a good test of speed switching due to the variable threaded nature of the program, and the MSI fits in mid pack, albeit 9 seconds behind some of the more efficient MultiCore Turbo enabled boards.
FastStone Image Viewer 4.2 - link
FastStone Image Viewer is a free piece of software I have been using for quite a few years now. It allows quick viewing of flat images, as well as resizing, changing color depth, adding simple text or simple filters. It also has a bulk image conversion tool, which we use here. The software currently operates only in single-thread mode, which should change in later versions of the software. For this test, we convert a series of 170 files, of various resolutions, dimensions and types (of a total size of 163MB), all to the .gif format of 640x480 dimensions.
Single threaded workloads on the MPower are still good, equaling the majority of our Z77 results.
Xilisoft Video Converter
With XVC, users can convert any type of normal video to any compatible format for smartphones, tablets and other devices. By default, it uses all available threads on the system, and in the presence of appropriate graphics cards, can utilize CUDA for NVIDIA GPUs as well as AMD APP for AMD GPUs. For this test, we use a set of 32 HD videos, each lasting 30 seconds, and convert them from 1080p to an iPod H.264 video format using just the CPU. The time taken to convert these videos gives us our result.
The Z77 MPower is again in the middle of the pack in video conversion, matching the Z77 OC Formula.
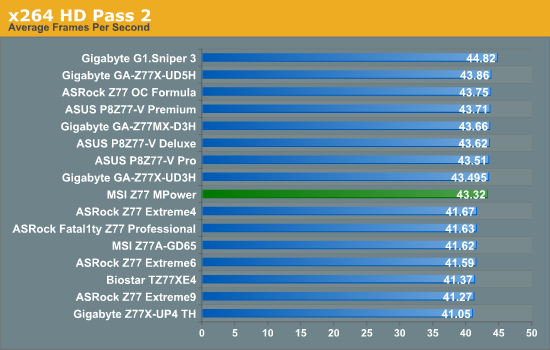
x264 HD Benchmark
The x264 HD Benchmark uses a common HD encoding tool to process an HD MPEG2 source at 1280x720 at 3963 Kbps. This test represents a standardized result which can be compared across other reviews, and is dependent on both CPU power and memory speed. The benchmark performs a 2-pass encode, and the results shown are the average of each pass performed four times.
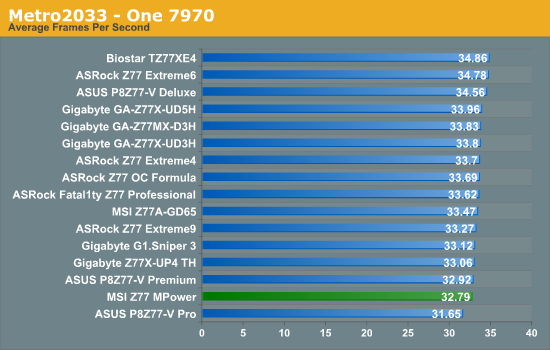
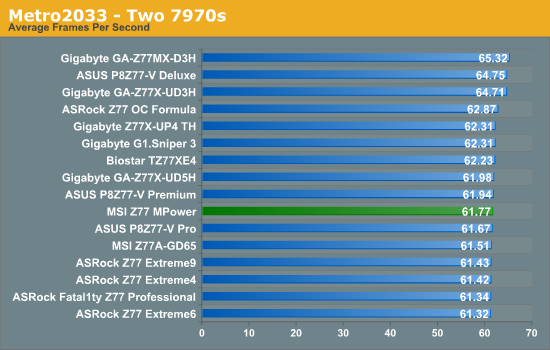
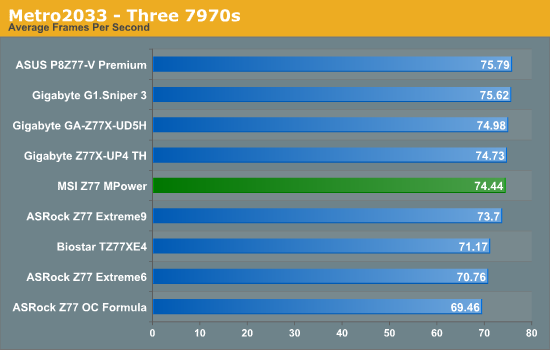
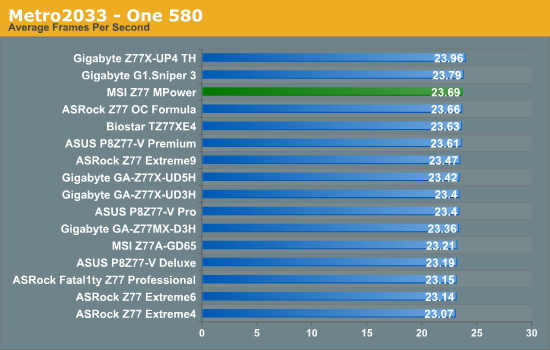
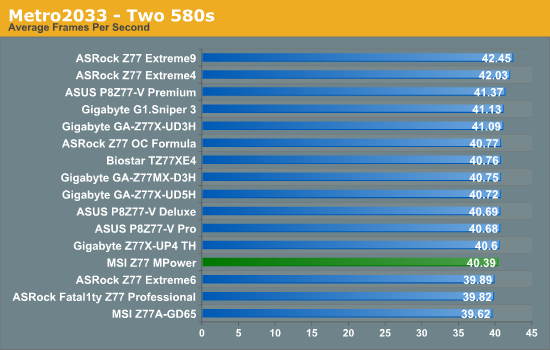
Metro2033
Metro2033 is a DX11 benchmark that challenges every system that tries to run it at any high-end settings. Developed by 4A Games and released in March 2010, we use the inbuilt DirectX 11 Frontline benchmark to test the hardware at 2560x1440 with full graphical settings. Results are given as the average frame rate from 4 runs.
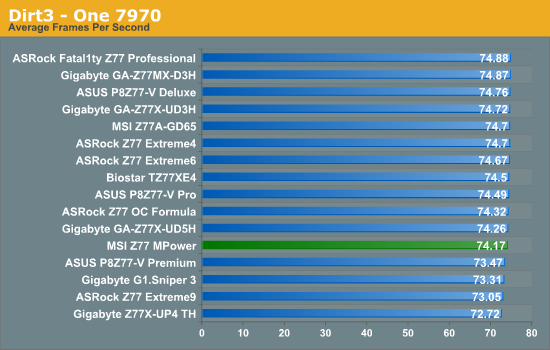
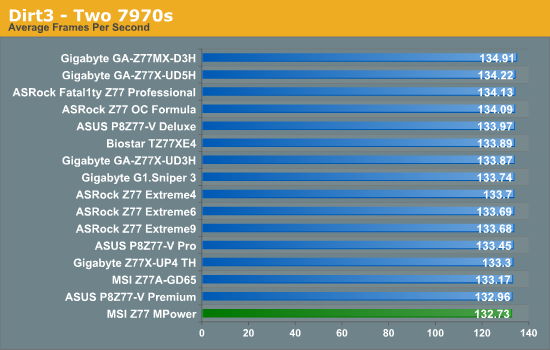
Dirt 3
Dirt 3 is a rallying video game and the third in the Dirt series of the Colin McRae Rally series, developed and published by Codemasters. Using the in game benchmark, Dirt 3 is run at 2560x1440 with Ultra graphical settings. Results are reported as the average frame rate across four runs.
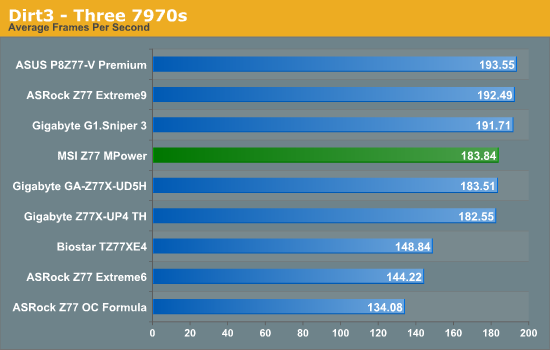
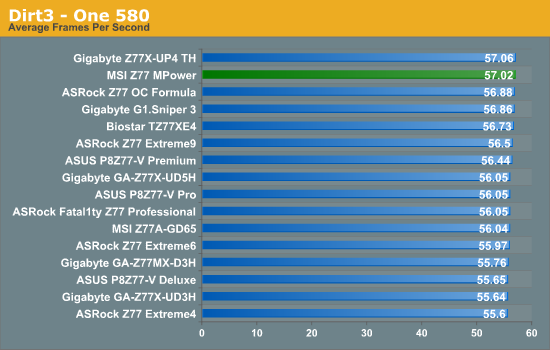
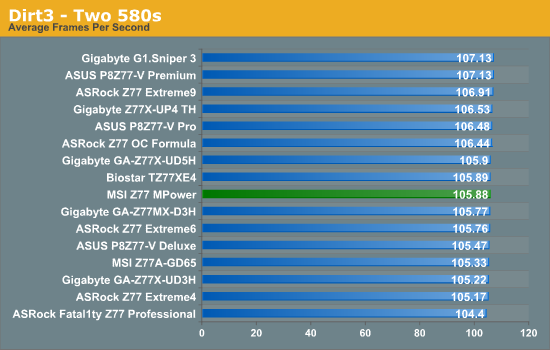
GPU Results
The MSI Z77 MPower always seems a little varied in the results, although it is never too far off the top in terms of actual percentages. For three-way 7970s, due to the x8/x4/x4 PCIe 3.0 configuration rather than the x8/x8/x4 PCIe 2.0 of the ASRock Z77 OC Formula, we see it excel here – in order to get more performance from a tri-GPU setup, we need to move towards the PLX 8747 boards.
MSI Z77 MPower
When building a top of the range product, each motherboard manufacturer has to decide on intended audience, features, and price point. Some companies like ASUS, ASRock and Gigabyte split up their high end products, with one side to focus on gamers and the other for overclocking. There is often a large amount of overlap between the two, as a motherboard specifically for extreme overclockers would not sell, but gaming oriented boards are not what overclockers are after in terms of components and stability. Another stringent factor comes in when dealing with the cost to build the motherboard, and the features that are put in or left out can make or break the product. The MSI Z77 MPower tries to take on all sides, being a lower-cost, extreme overclocking and gaming oriented product, attempting to undercut the competition.
Back at Computex 2012, we were told that the MPower will also come with an overclocking warranty, whereby if the board fails due to an overclock, then MSI will replace it (but not the CPU or any other equipment). Since then there has been no mention of this since that time, and I cannot find any information relating to it, it stands to reason that the MPower has a standard (location dependent) three-year warranty. I was hoping that this overclocking warranty would actually pull through as part of the package.
MSI’s main prowess with the Z77 MPower comes from different directions. Firstly the visuals, which are designed to match with the MSI Lightning series of graphics cards with the blocky black and representative yellow decals. We then get MSI’s testing procedure with the Z77 MPower, which gives each board off the production line a 24-hour Prime95 stress test using a 30% overclocked CPU and an all-in-one liquid cooler, though no indication of explicitly what CPU was used. An August 2012 press release on the MSI website states 4.6 GHz, suggesting an i7-3770K, though on the product page and box it does not explicitly state this for some unknown reason.
For gamers, the MSI Z77 MPower gives an ideal PCIe layout for dual setups with a three slot gap between the first to full-length PCIe slots, and the overall PCIe lane allocation from the CPU suitable for three-way CrossFireX, compared to some other Z77 boards that borrow four PCIe 2.0 lanes from the chipset. The addition of the OC Genie button lets a user give an instant 4.2 GHz overclock on an i7-3770K, meaning more performance at the touch of a button. The onboard WiFi and Bluetooth is fairly standard, along with the Realtek NIC and audio – in all cases we would have preferred upgraded versions to push this high end MSI board above equivalent priced products.
For extreme overclockers there is a flat socket area suitable for sub-zero insulating, as well as power/reset/ClearCMOS/Go2BIOS buttons for ease of use when the board is outside a case. The two-digit debug is a must-have on a board this price, and the MSI one doubles up as a temperature sensor when in the operating system. Unfortunately the BIOS is a little buggy, and the overclocking section is more of a mess than a well-structured part of the package. Nevertheless we were able to hit 5.0 GHz stable in our testing, albeit in cold air and a peak load temperature of 99ºC – the memory was also able to jump from 2666 C11 to 2800 C11 with no more than a bump in the memory strap.
Performance wise the MSI Z77 MPower ran around average in our benchmarking tests due to the inclusion of a form of MultiCore Turbo, giving the CPU maximum turbo no matter the loading. The only major fault was in the USB 2.0 speeds, whereby like the Z77A-GD65 the system achieved 26 MBps read and write, rather than the usual 30-34 Mbps seen on other Z77 motherboards.
The software package on the Z77 MPower is coming together nicely, with Live Update 5 keeping sure that users are up to date on all the latest versions. MSI Control Center gets skinned for the Big Bang range, and the upgraded fan controls on the board are easy to use, even if it doesn’t fully encompass the non-linearity of the natural power-RPM curve of a fan.
The MSI Z77 MPower is a jack of all trades, yet master of none. It sits looking nice, and those willing to dive into the settings should be able to get something good to work in a home system. But for a home system there is plenty of competition at the $210 price point, and extreme overclockers who want the best will only consider the MSI based on brand loyalty or funds (despite fierce competition +/- $30).
What MSI need to do is bring out a specific gaming SKU, and another SKU that works for overclocking but can also be gaming oriented, for example with an add-in card with audio/network, suitable numbers of USB/SATA ports, and on-the-fly adjustment buttons. With these in place, they can then look to lower cost versions of each to hit various price points. The other three main motherboard manufacturers have recognized and done this, and I look forward to MSI’s entry for Haswell and Z87.


